Mysore Curd Bonda
on Feb 09, 2023
This post may contain affiliate links. Please read our disclosure policy.
Mysore Curd Bonda is a popular street food in South India. These fried balls are crispy, soft and very delicious, making for the perfect tea-time snack! This dish can be quickly assembled with minimal preparation and a few basic pantry ingredients!

Love Indian Snacks? Try my Punjabi Samosa, Aloo Paneer Tikkis (Healthy Peas Potato & Paneer Tikki or Veg Cutlets with Potatoes and Beetroot | Veg Croquettes recipes!
I take my evening snacks pretty seriously! There are very few things I love as much as taking a break from work to sit in peace with a hot cup of tea and a snack. But since I don’t have a lot of time to whip up elaborate recipes in my little 5-pm break, I am always looking up easy evening snack ideas that are also delicious. And this Mysore Bonda fits the bill so perfectly!
Mysore Bonda or perugu bonda might not be as popular as medu veda, but it is definitely just as delicious. These fried balls have a spicy-sour taste thanks to the mixture of curd, green chillies and flour that is left outside for a few hours to ferment. Mixing the curd with the flour and green chillies during fermentation allows the flour and curd to soften, while the curd to absorb all the spiciness from the chillies. This is an important step and is responsible for the delicious flavour and texture of the bonda.
The addition of veggies and spices delivers an added layer of flavour and texture to the whole dish. Besides, if you, like me, believe that an evening snack is incomplete without that lovely crunch, then this Mysore Bonda is just the perfect dish for you!
Here are some more reasons why you need to make this recipe:
- A crispy and spongy dish that makes for the perfect 5 pm snack.
- Can be put together with just a handful of pantry staples.
- Even though it requires a little prep, the active cooking time is less than 20 minutes. Making it perfect for weekdays too.
- Can be served with so many different things, including mint chutney, coconut chutney, coriander chutney, plain puffed rice and even garlic rasam.
- This recipe can be easily doubled if you are making it for a large crowd.
- Is a really simple recipe that’s perfect for beginners too.
Ingredients You’ll need to make Mysore Curd Bonda
- Curd: The hero ingredient and the reason behind the lovely sour flavour of the bonda. I have used home set curd for this recipe, but any store-bought curd will work too.
- All-purpose flour: Works as a binding agent and has a neutral flavour and works best for this recipe.
- Green chillies: For heat and flavour. Ground to a fine paste.
- Rice flour: Responsible for that lovely crunch of the bondas. Also makes them light and airy
- Sooji: Helps add additional crunch and another level of binding to prevent the bondas from breaking apart from frying.
- Baking soda: This is what will make the bondas perfectly crispy on the outside while keeping them soft and fluffy on the inside. A little goes a long way.
- Veggies: I have added finely chopped onions and grated carrots.
- Curry and coriander leaves: Both finely chopped. Lend a nice earthy flavour to the whole dish.
- Ginger: Finely chopped for an added flavour boost.
- Salt: For flavour and seasoning.
How to make Mysore Curd Bonda
Here’s a step-by-step collage showing you how to make Mysore Curd Bonda:
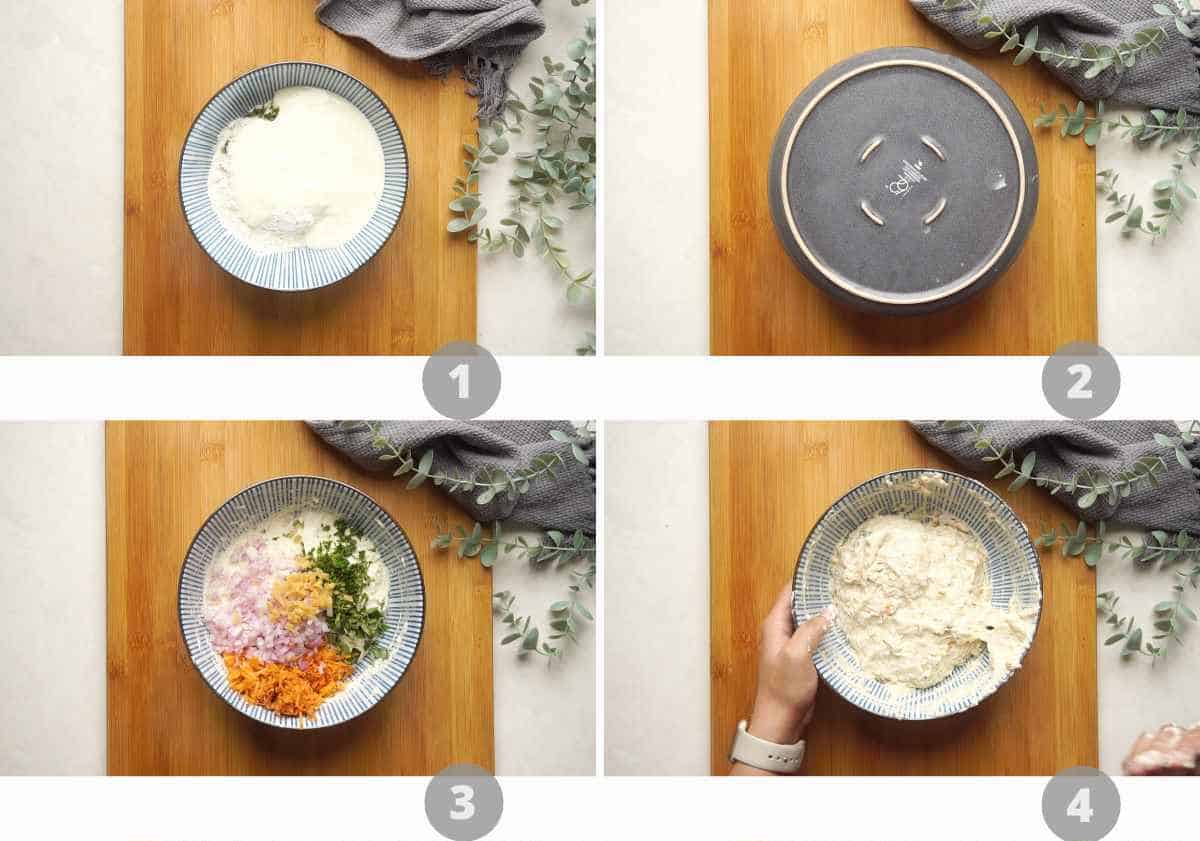
1. Add curd, all purpose flour and green chilli paste to a bowl. Mix to combine. Ensure there are no lumps.
2. Cover and store on the counter for 6 hours or until the curd ferments and gets a sour taste.
3. Add rice flour, semolina, salt, baking soda, chopped onion, grated carrot, curry leaves, ginger and coriander.
4. Mix to combine and ensure there are no lumps.

5. Heat oil in a kadai on high heat. Reduce the heat to low and carefully add small dollops of the batter into the kadai using your hand.
6. Allow it to cook on low flame for 5-6 minutes and increase the heat to medium. Cook for 2-3 minutes or until the bondas get a bright golden brown colour. Use a skimmer to remove them from the kadai and serve hot along with some mint chutney and plain puffed rice!
Richa’s top tips to make the best Mysore Curd Bondas
- Make sure that the curd isn’t already very sour before fermenting it. You can use fresh curd or day-old curd. If you use really old curd, it would make the dish very very sour. Combine the veggies right before frying to make the batter nice and thick.
- When frying the bondas, make sure the oil is sufficiently hot before adding in the batter. Here’s how you can easily check the temperature of the oil.
- The consistency of the batter plays a really important role in achieving the perfect results. The batter shouldn’t be too thick or too runny and it should have a nice fluffy texture for making the best bondas.
- When fermenting the curd and while adding the dry ingredients make sure that the batter is smooth and has no lumps.

Once you try these Mysore bondas, I promise you’ll be craving them all the time! The sour-spicy flavours and the crispy-fluffy texture of this recipe makes anyone who tries it a die-hard fan. I serve mine with some mint chutney and plain puffed rice, along with some tea and coffee, of course. But here’s a little secret – however you serve this one, it’s sure to be a hit with anyone who tastes it!
More Snack Recipes

Indian Recipes
Sabudana Vada stuffed with Paneer

Appetizers
Tandoori Paneer Tikka in the Oven


Appetizers
Chinese Potli Samosa Wontons
LOVE THIS RECIPE? Subscribe to my newsletter and be the first to receive all new recipes!

Mysore Curd Bonda
Ingredients
- 1 Cup Curd
- 1 Cup All Purpose Flour
- 2 Tablespoons Green Chilli Paste
- 2 Tablespoons Rice Flour
- 1 Tablespoon Semolina, sooji
- 1 Teaspoon Salt
- ¼ Teaspoon Baking Soda
- ¼ Cup Chopped Onion, finely chopped
- ¼ Cup Grated Carrot
- 2 Tablespoons Chopped Curry Leaves
- 1 Tablespoon Chopped Ginger, finely chopped
- 1 Tablespoon Chopped Coriander
Instructions
- Add curd, all purpose flour and green chilli paste to a bowl. Mix to combine. Ensure there are no lumps.
- Cover and store on the counter for 6 hours or until the curd ferments and gets a sour taste.
- Add rice flour, semolina, salt, baking soda, chopped onion, grated carrot, curry leaves, ginger and coriander. Mix to combine and ensure there are no lumps.
- Heat oil in a kadai on high heat. Reduce the heat to low and carefully add small dollops of the batter into the kadai using your hand.
- Allow it to cook on low flame for 5-6 minutes and increase the heat to medium. Cook for 2-3 minutes or until the bondas get a bright golden brown colour.
- Use a skimmer to remove them from the kadai and serve hot along with some mint chutney and plain puffed rice!
Notes
-
- Make sure that the curd isn’t already very sour before fermenting it. You can use fresh curd or day-old curd. If you use really old curd, it would make the dish very very sour. Combine the veggies right before frying to make the batter nice and thick.
- When frying the bondas, make sure the oil is sufficiently hot before adding in the batter. Here’s how you can easily check the temperature of the oil.
- The consistency of the batter plays a really important role in achieving the perfect results. The batter shouldn’t be too thick or too runny and it should have a nice fluffy texture for making the best bondas.
- When fermenting the curd and while adding the dry ingredients make sure that the batter is smooth and has no lumps.