Neer Dosa | Lacy Rice Crepes
on Jul 04, 2022, Updated Aug 22, 2022
This post may contain affiliate links. Please read our disclosure policy.
A Mangalorean speciality, Neer Dosa is a simple dosa recipe which doesn’t need any fermentation. These dosas are soft, thin, and lacy and are an amazing carrier to soak up any curry or flavours.
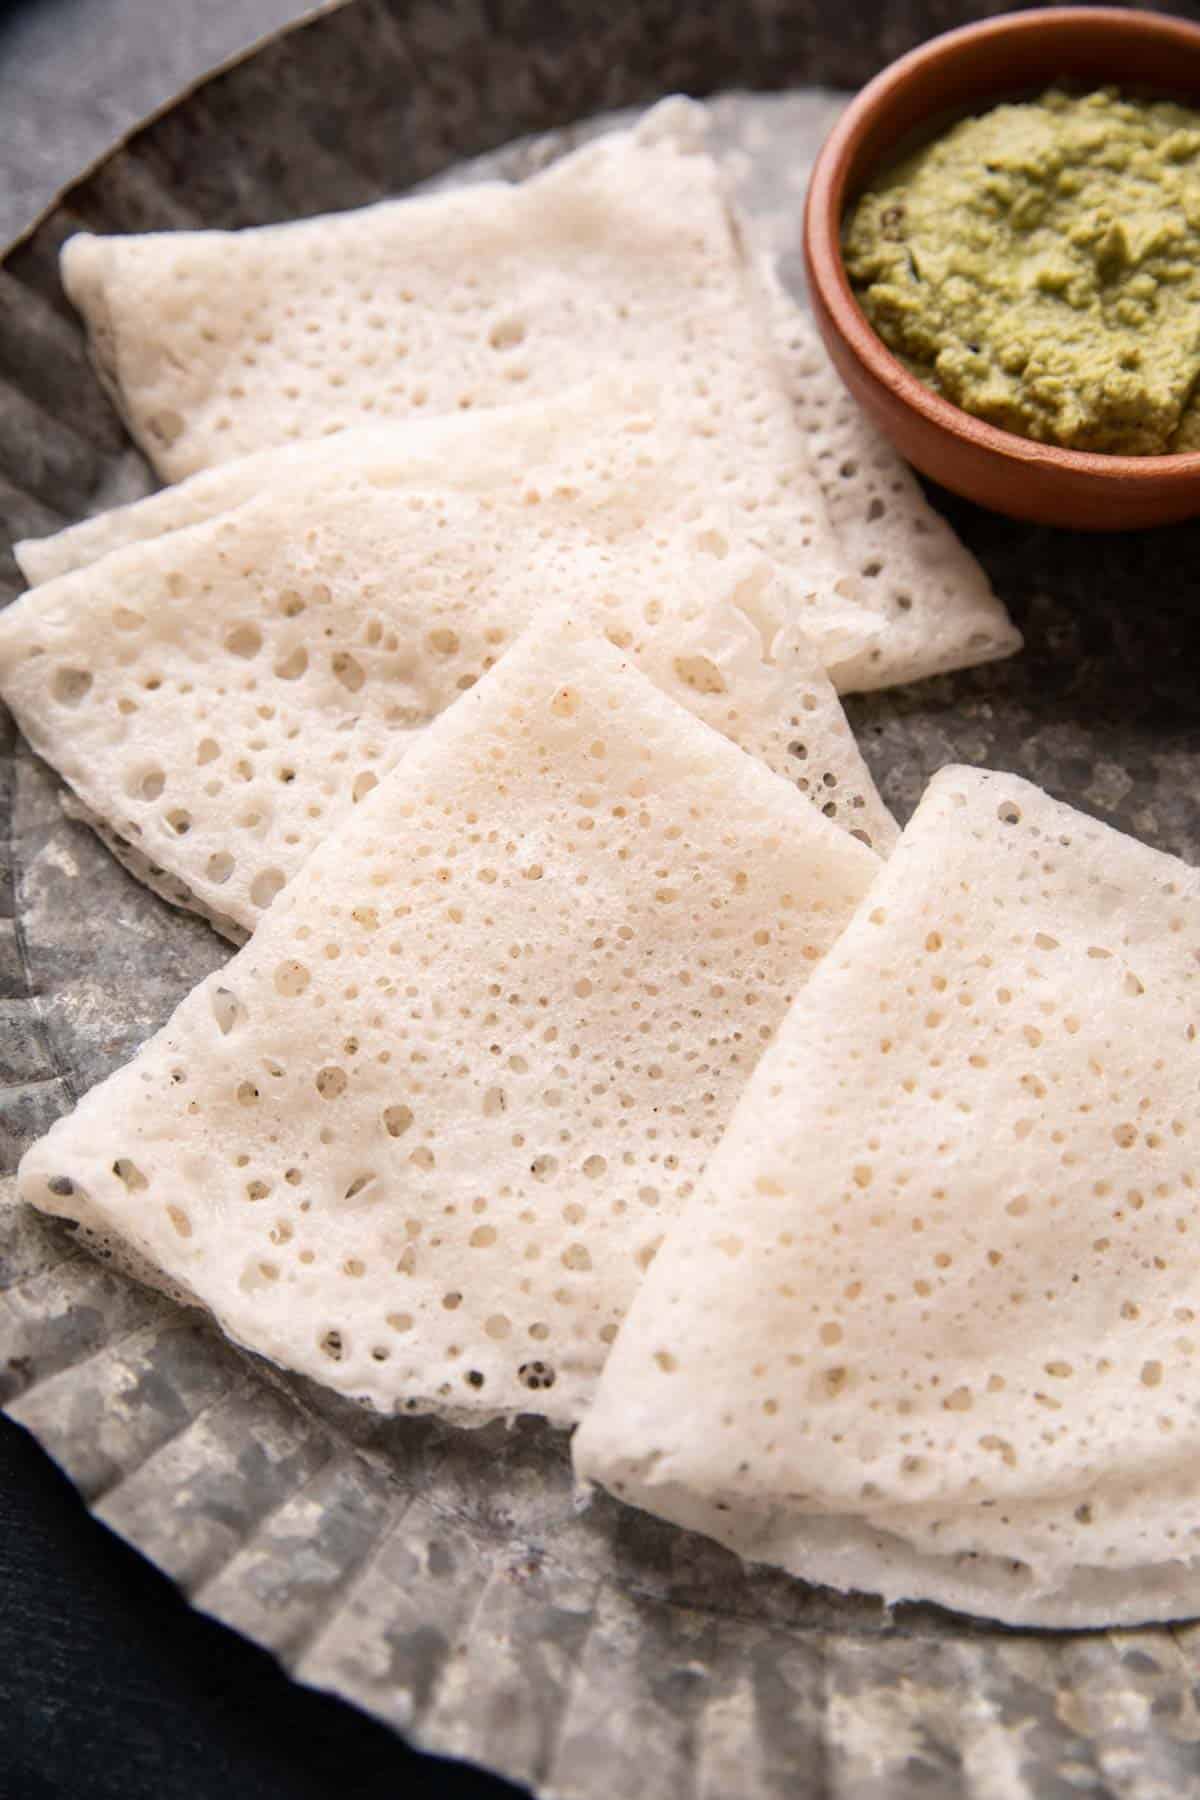
One of the first things I learnt after getting married to Denver and his Mangalorean family was how to make Neer Dosa. I was and still am so fascinated by how something so simple can taste so amazing. I can only describe these as French crepes but lighter, softer and thinner. Made with soaked rice, this isn’t your regular dosa – these rice crepes are soft, thin, and lacy and they soak up flavours super well.
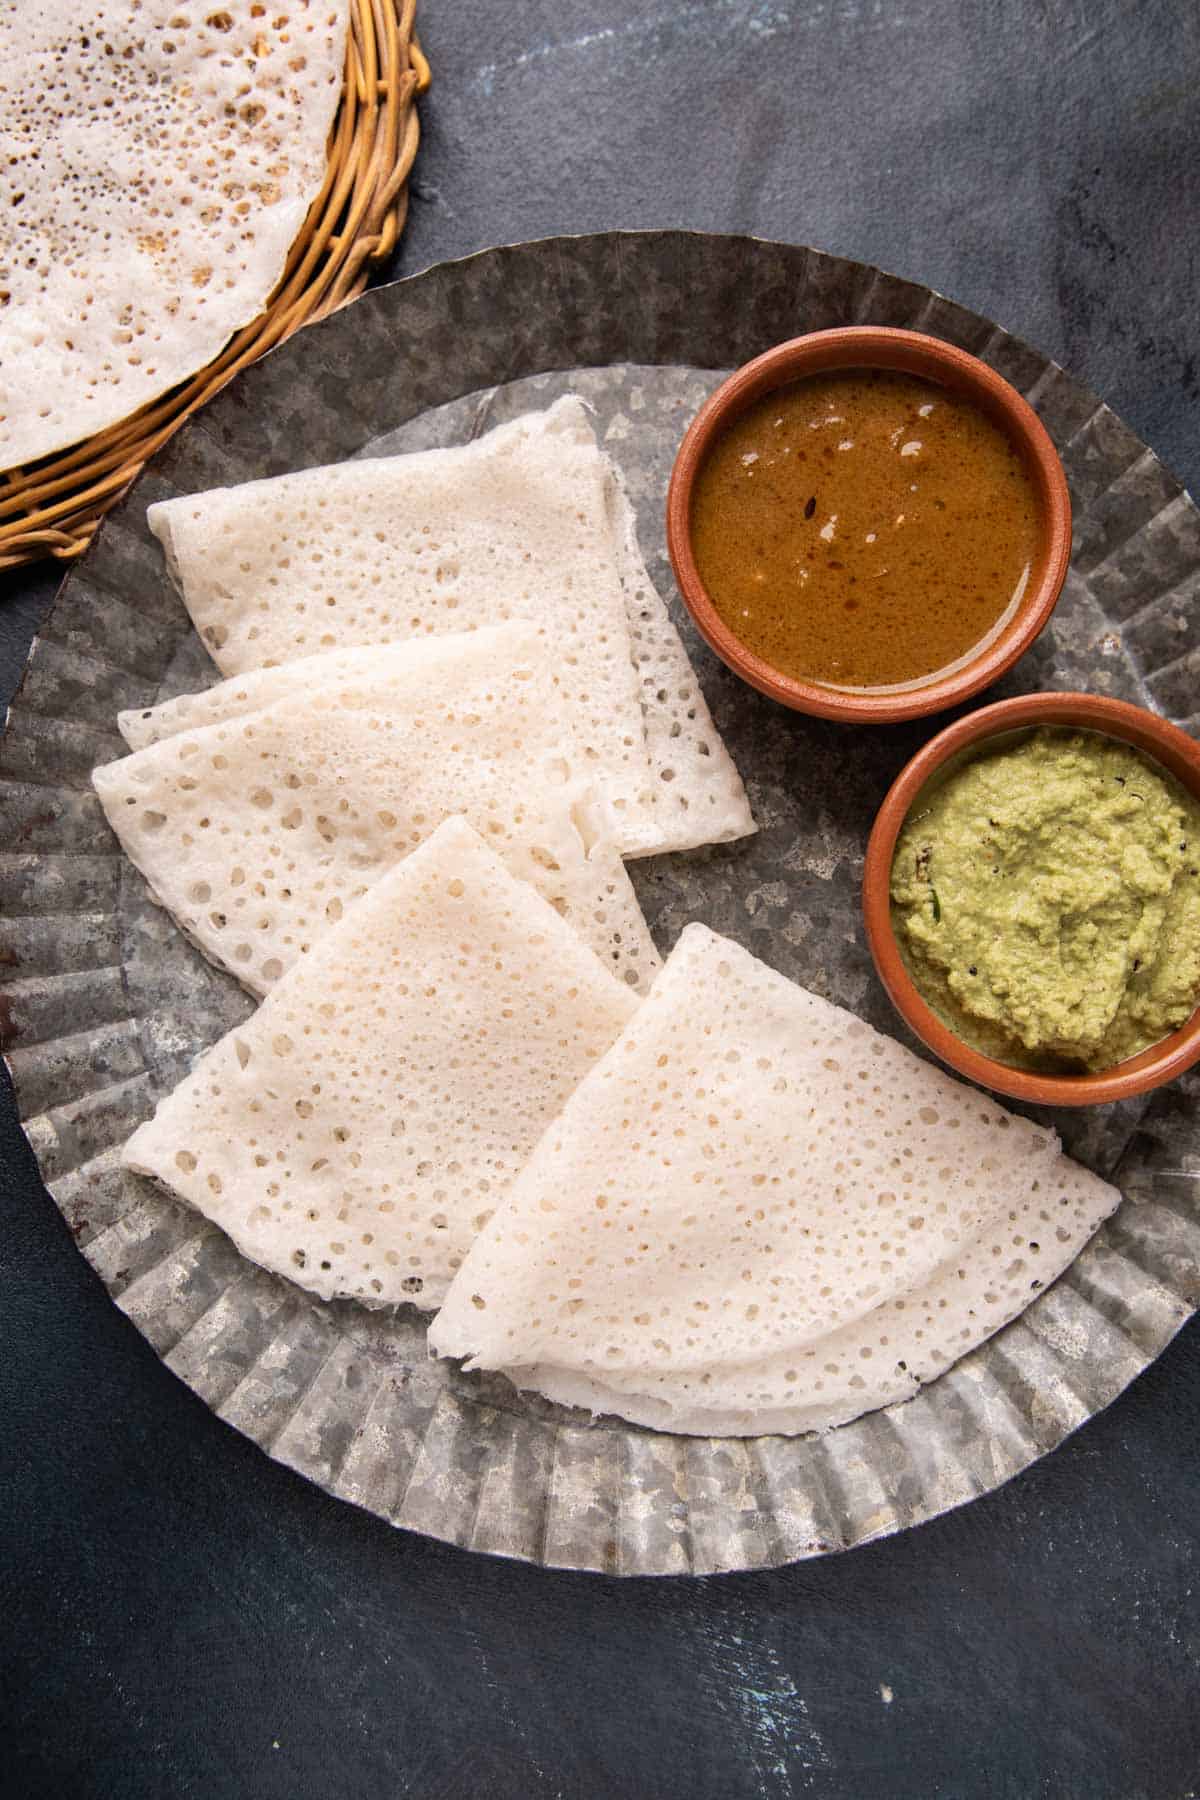
My favourite way to eat them is with a spicy curry like Kori Gassi or a South Indian style Egg Curry, but a tasty chutney also works well. They’re really quick to whip up since the batter doesn’t need fermentation, making it the perfect option for breakfast, lunch or dinner.
Love South Indian food? Try Idli Dosa Batter, Millet Mysore Masala Dosa, Chutney Recipes, Tomato Chutney – 2 Ways, Jesse’s Rasam Recipe | Tomato Rasam and South Indian Style Egg Curry
What is Neer Dosa?
Neer basically means water and that’s what gives these dosas their name – the batter is really thin, like the consistency of milk. Neer dosa is made by soaking idli rice overnight or for at least 6 hours and then blending the soaked (and drained) rice with freshly grated coconut, water and salt.
The coconut is added for the slight nutty flavour it gives to the dosa. The batter is blended till it’s nice and smooth – you shouldn’t feel any grittiness when rubbing it between your fingers. The batter is then poured into a hot, greased non-stick or cast iron dosa tava pan, and then cooked for a few minutes.
This dosa recipe without fermentation is quick and easy to make and light on the stomach. It’s also perfect school lunch box material since it’s finger food and not too heavy. My daughter LOVES these for school!
Here’s everything you’ll need to make Neer Dosa
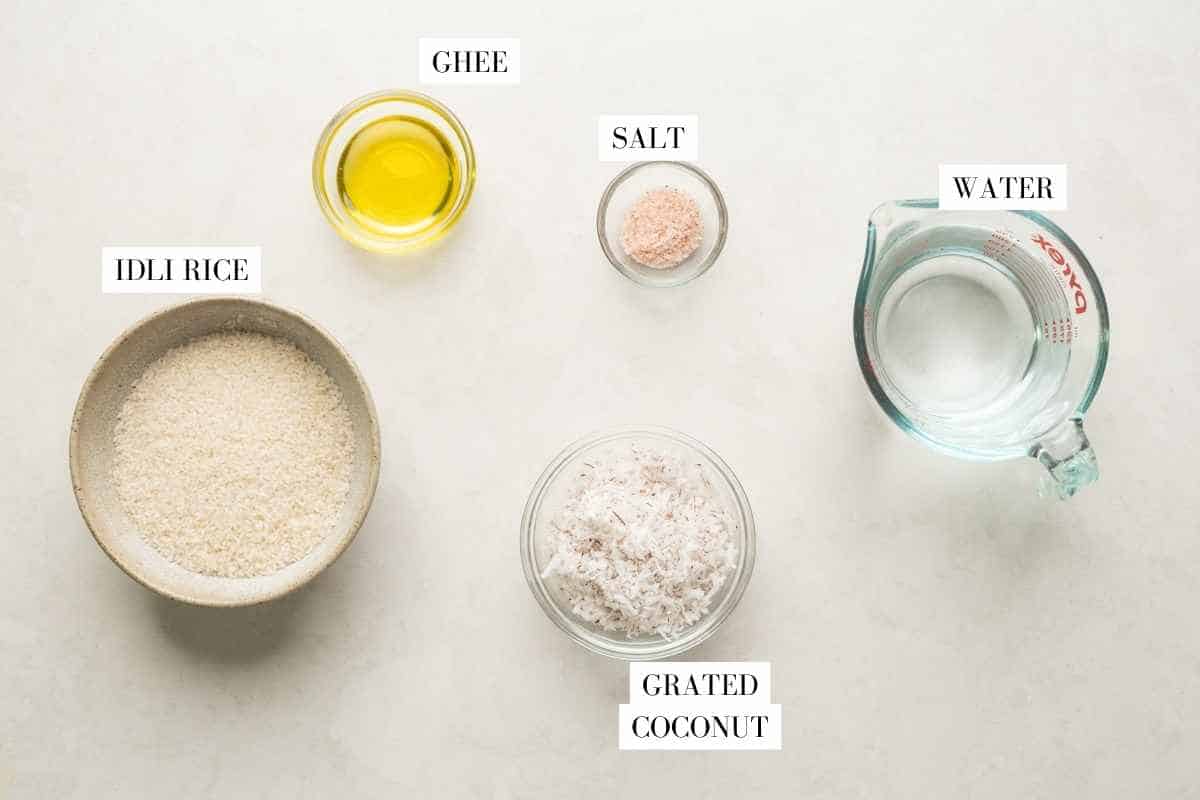
- Rice – Idli Rice works best here but you can use any short grain rice variety for the batter.
- Grated Coconut – I use it in a 1:4 ratio of rice to coconut. This ingredient is optional, but I find that grinding the rice with a little coconut helps enhance the flavor
- Water – Don’t add too much water while grinding, otherwise the rice won’t grind properly. Only add ½ -¾ cup of water for every cup of soaked rice while grinding, for a smooth batter.. Once the batter is ready, mix more water to get the right consistency – thicker than water, slightly viscous like the consistency of milk. Totally we need about 2 ¼ – 2 ½ cups per cup of rice
- Salt – An obvious but essential ingredient, for taste
- Ghee – For greasing the pan. Sub with a neutral flavoured oil. Don’t use butter or the neer dosa will be slightly brownish
How to make Neer Dosa
Here’s a quick step by step showing you how to make neer dosa at home:
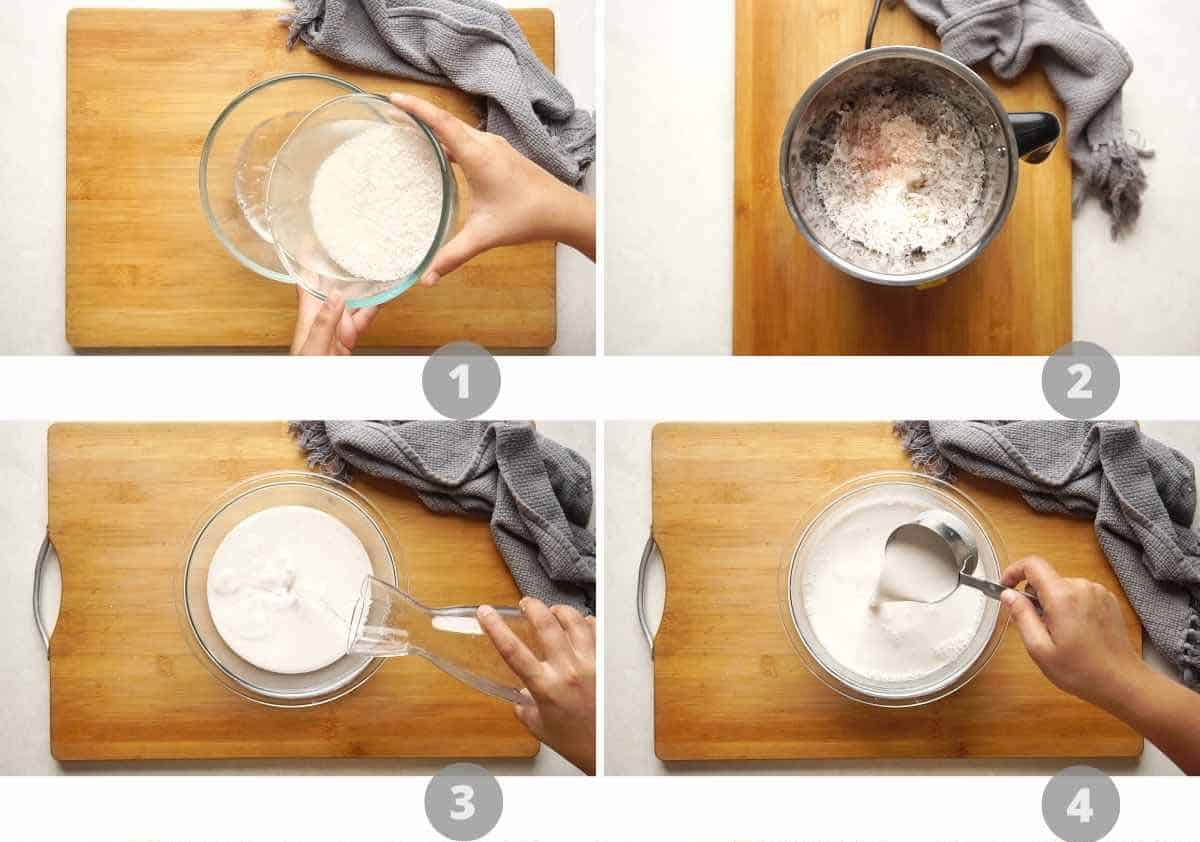
1. Soak idli rice overnight. Drain completely.
2. Add idli rice, grated coconut, ¾ cup of water and salt to a mixer and grind to a smooth paste.
3. Transfer the paste to a bowl, add 1 ½ cup of water, and mix well. Adjust the consistency with the remaining water if necessary.
4. The consistency should be like milk, easy to pour.
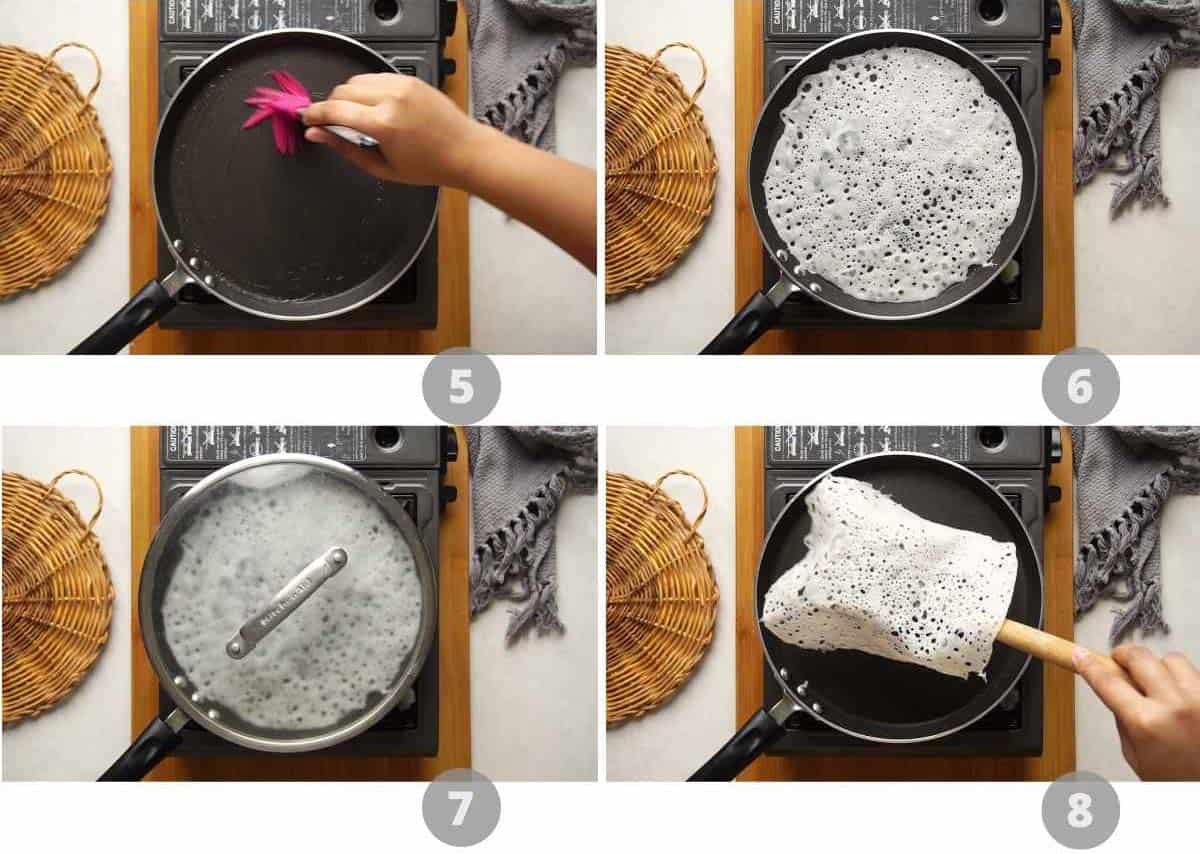
5. Heat a non-stick pan and brush it with ghee.
6. Pour a ladleful of batter and swirl it around till the base is covered.
7. Cook for 30 seconds and then cover and cook it for 30 more seconds on low. Remove the lid and cook for another 15-20 seconds.
8. Once you start seeing the edges leaving the pan, the dosa is ready.
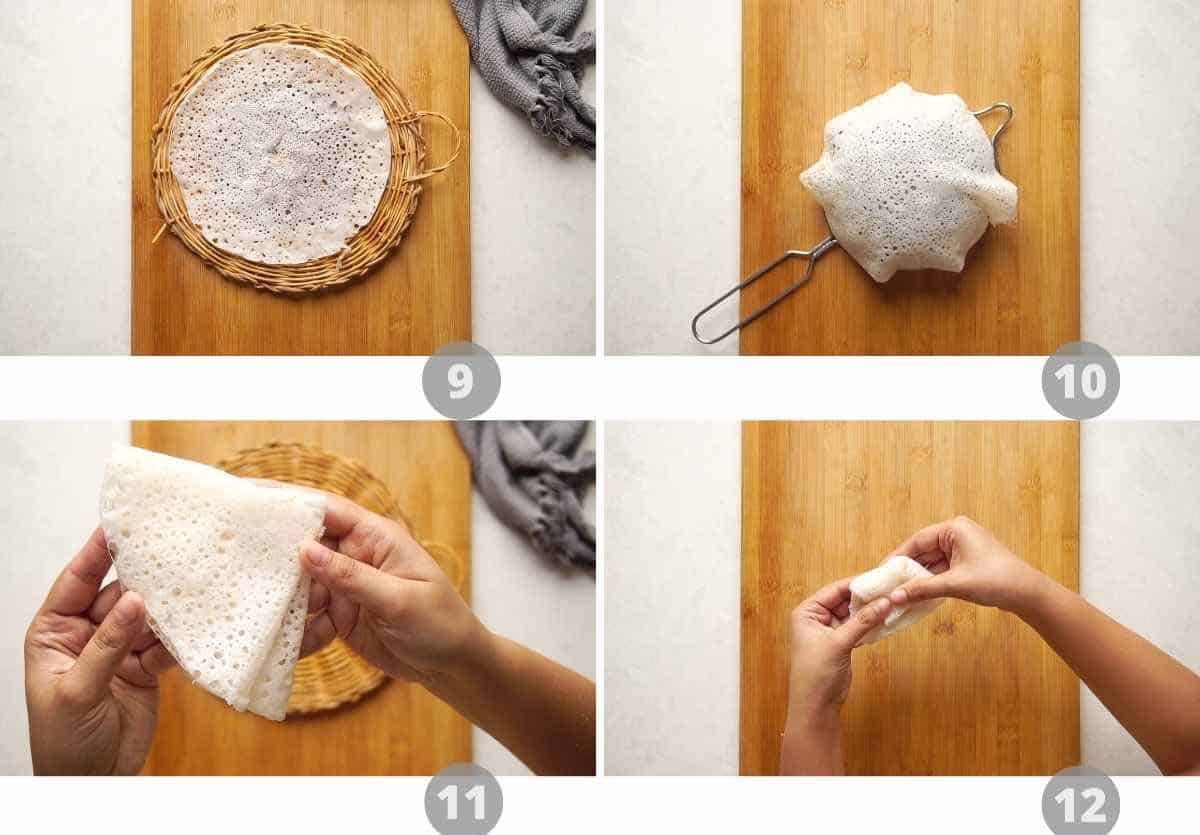
9. Slide it out on a perforated surface like bamboo trivet.
10. You can also use a sieve, turn it upside down and lay the dosa over it. This allows it to cool completely without becoming sticky.
11. Fold into a triangle and serve.
Richa’s top tips to make the perfect Neer Dosa:
- Make sure to soak the rice overnight or for at least 6 hours before making the batter to ensure the grains can be ground smoothly.
- Mix the batter every time you make a dosa. As the batter sits, the heavier ground rice starts to sit at the bottom of the bowl. Mixing it brings everything together
- Move the pan around after pouring the batter so that the batter covers the base in a thin layer
- You should see small bubbles appear on the dosa while cooking – like a lace, which means the consistency of the batter is perfect. Cook for 30 seconds, and then cover and cook for another 30 seconds or until you see the edges coming off, which means the dosa is ready.
- Slide the dosa out of the pan – don’t flip it!
- Place the cooked dosa on a perforated surface like a large sieve or a traditional neer dosa cooling sieve to let it cool completely before folding it.
- Troubleshooting Tip: If your dosa starts to develop cracks on the surface as it cooks, it means the batter is too thick and you may need to add a teaspoon or two of water to the batter and mix to adjust the consistency again
Frequently Asked Questions
Why is it called neer dosa? Neer means water in Tulu language from the western region of Karnataka, so neer dosa translates to water dosa, to represent the thin consistency of the batter which is quite different to the thickness of regular dosa batter.
Is neer dosa good for health? Neer dosa is gluten-free and can be vegan. It is quite light and easily digestible, making it a great healthy breakfast option.
Why is neer dosa famous? Neer dosa is a great alternative to dosa as it is a no fermentation recipe that comes together fairly quickly to satisfy those sudden dosa cravings and is famously served across restaurants in Karnataka.
The next time you have a craving for dosa, be sure to try out this neer dosa recipe – you won’t turn back! Enjoy it fresh or pack it for the go, this recipe is perfect anytime of day and anywhere.
If you like easy dosa recipes like this, you can also try making my instant oats dosa.
Neer Dosa goes well with – Chutney 3 Ways, Tomato Chutney – 2 Ways, Mushroom Pepper Fry (South Indian style), Spicy Chettinad Pepper Chicken Fry/Roast and South Indian Style Egg Curry
Watch the Recipe Video
LOVE THIS RECIPE? Subscribe to my newsletter and be the first to receive all new recipes!

Neer Dosa
Ingredients
- 1 Cup Idli Rice, soaked overnight and drained
- 1/4 Cup Grated Coconut
- 2 1/4 – 2 1/2 Cups Water
- 3/4 Teaspoon Salt
Instructions
- Add idli rice, grated coconut, ¾ cup of water and salt to a mixer and grind to a smooth paste.
- Transfer the paste to a bowl and add 1 ½ cup of water and mix well. Adjust the consistency with the remaining water if necessary. The consistency should be like milk.
- Heat a non-stick pan and brush it with ghee. Pour a ladleful of batter and swirl it around till the base is covered. Cook for 30 seconds and then cover and cook it for 30 more seconds on low. Remove the lid and cook for another 15-20 seconds.
- Once you start seeing the edges leaving the pan, the dosa is ready. Slide it out on a perforated surface like a sieve. This allows it to cool completely without becoming sticky. Fold into a triangle and serve.
Video
Notes
- Make sure to soak the rice overnight or for at least 6 hours before making the batter to ensure the grains can be ground smoothly.
- Always mix the batter before making the next dosa. The batter starts to sediment because of the amount of water in it, so mixing is very important
- Move the pan around after pouring the batter so that the batter covers the base in a thin layer
- You should see small bubbles appear on the dosa while cooking – like a lace, which means the consistency of the batter is perfect.
- Slide the dosa out of the pan – don’t flip it!
- Place the cooked dosa on a perforated surface like a large sieve or a traditional neer dosa cooling sieve to let it cool completely before folding it.
- If your dosa starts to develop cracks on the surface as it cooks, it means the batter is too thick and you may need to add a teaspoon or two of water to the batter and mix to adjust the consistency again
- Use ghee or oil to brush the pan. Don’t use butter or the base of the dosa will start to become brown
- Neer Dosa goes well with – Chutney Recipes, Tomato Chutney – 2 Ways, Mushroom Pepper Fry (South Indian style), Spicy Chettinad Pepper Chicken Fry/Roast and South Indian Style Egg Curry
This recipe is absolutely spot on! For not being a Mangalorean or having watched anyone make this, my Mangalorean spouse raves about the Neer Dosas I make using this recipe. Detailed steps and a tasty recipe. Thanks Richa!
Yaay! So glad that you and your husband liked it, Cleona. Thanks for leaving a comment
I made this for the first time following Richa’s detailed steps and it came out amazing! Couldn’t believe how easy it was to make. My Mangalorean hubby went on raving about it. Thanks Richa!
Hey Cleo, Really glad you enjoyed it
The recipe is bang on. So easy to follow and the dosas come out just like in the video and tastes great too.