Pav Bhaji Recipe – Mumbai Style
on Sep 29, 2021, Updated Oct 14, 2021
This post may contain affiliate links. Please read our disclosure policy.
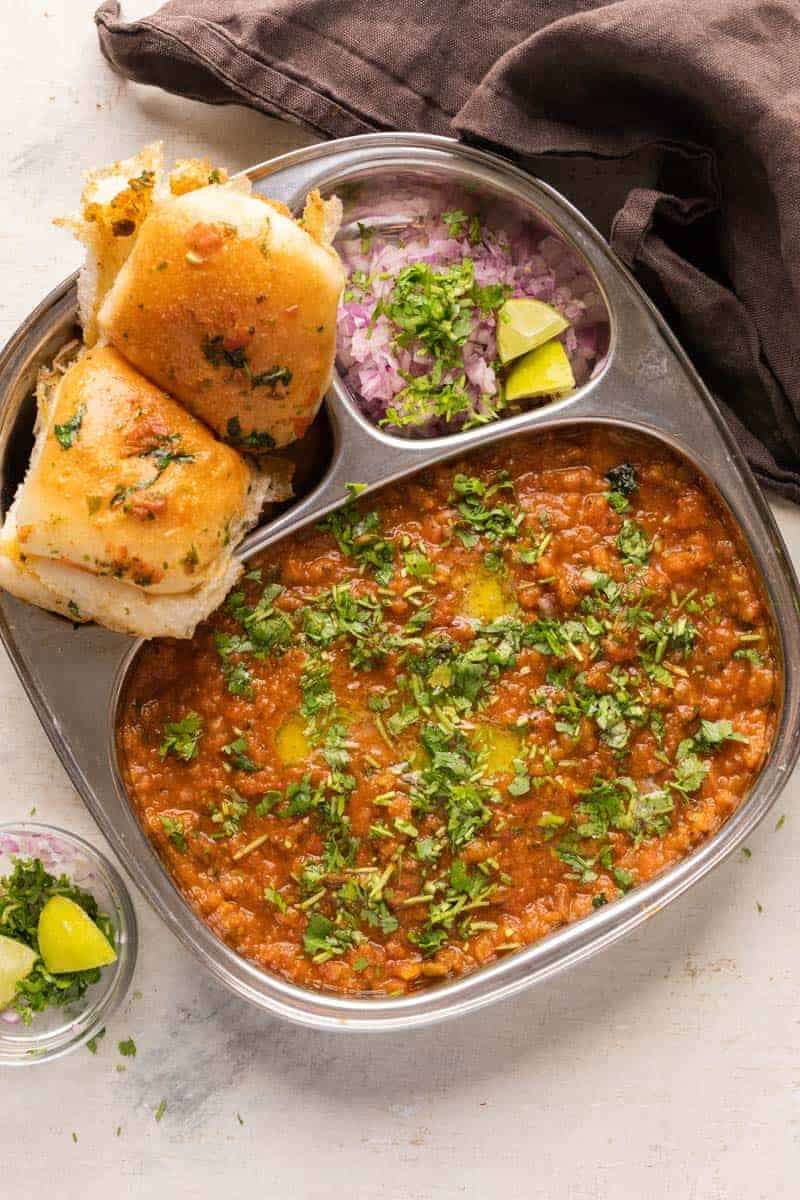
Pav Bhaji is a popular Indian street food that’s basically mashed vegetables tempered with spices and butter and topped with lots of coriander and lime juice. Served with ladi pav, this dish like all Indian street food, is BIG on flavours!
If you are from India you already know the cult following that Pav Bhaji has. If you live outside the country and have never tasted this, we need to change that asap.
Like most people, I grew up eating pav bhaji on the street at the local thela or kiosk where the bhaji would be freshly tempered once the order was placed, the pav or buns would be lightly tossed in butter on the hot pan after the bhaji was done. The smell is unbeatable. The steaming hot pav bhaji is unbeatable. And recreating this at home is really difficult.
But we did multiple round of tests, many variations and found the perfect recipe that gives us that amazing street style taste at home.
This Pav Bhaji recipe is
- Spicy and full of flavour. I’m showing you how to use basic store bought pav bhaji masala and turn it into the most delicious bhaji
- Has a fantastic texture. The key to good bhaji is mashing the vegetables as you go. Keep adding water and mashing cooked vegetables till everything is homogenous but isn’t completely smooth
- Buttery. Just one word because there is no pav bhaji without lots and lots of Amul Butter (an Indian brand of salted butter whose unique taste makes pav bhaji so amazing)
If you don’t believe me, just watch the first few seconds of the video below to see how good this looks!
How to make Pav Bhaji + Ingredients
Here’s everything you need to make pav bhaji at home
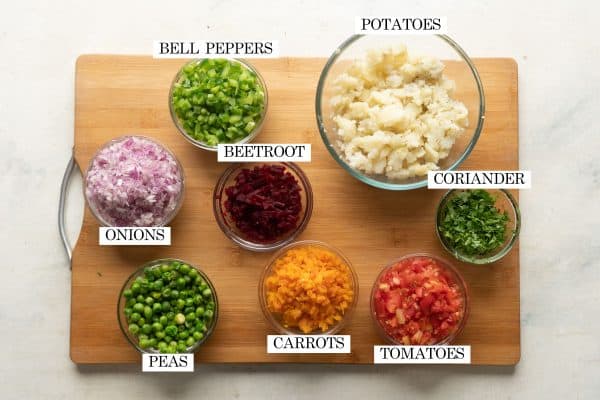
Vegetables: Prep all your vegetables ahead. The vegetables need to be boiled or pressure cooked so that they are tender and can be easily smashed between the fingers. These can be prepped up to a day ahead.
I prefer cooking the vegetables separately because the cooking time of each vegetable is different. But if you are short on time, you can roughly chop everything and pressure cook or boil them together till tender and then drain any extra water
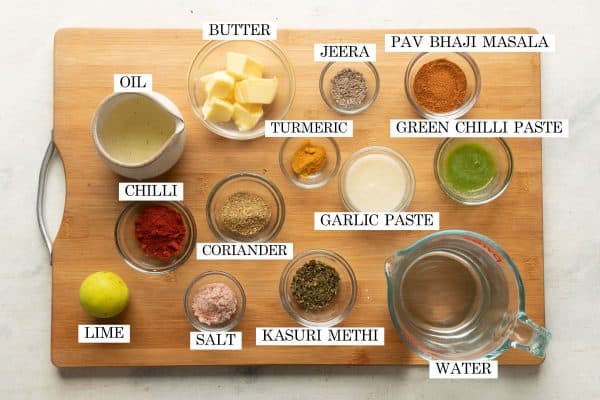
- Oil & Butter: Pav Bhaji needs a lot of fat, particularly butter to get that texture and flavour. The potatoes and vegetables keep soaking up the butter as you cook so it won’t feel oily when you eat it. Use a neutral flavoured oil, and Amul Butter if you can get your hands on it
- Spices: Jeera (cumin seeds), pav bhaji masala (I generally use Everest), Chilli Powder (for an extra hit of colour and heat), coriander powder, turmeric powder and kasuri methi (dried fenugreek leaves)
- Ground Pastes: Garlic paste which is basically garlic ground with water to make a thick paste and Green Chilli Paste which is green chillies ground with water. A lot of recipes use ginger garlic paste, but after many tests we realised that the key to really good street style pav bhaji is just garlic and green chilli pastes.
- Lime: Lots of lime to balance all the flavours and add some freshness and tang
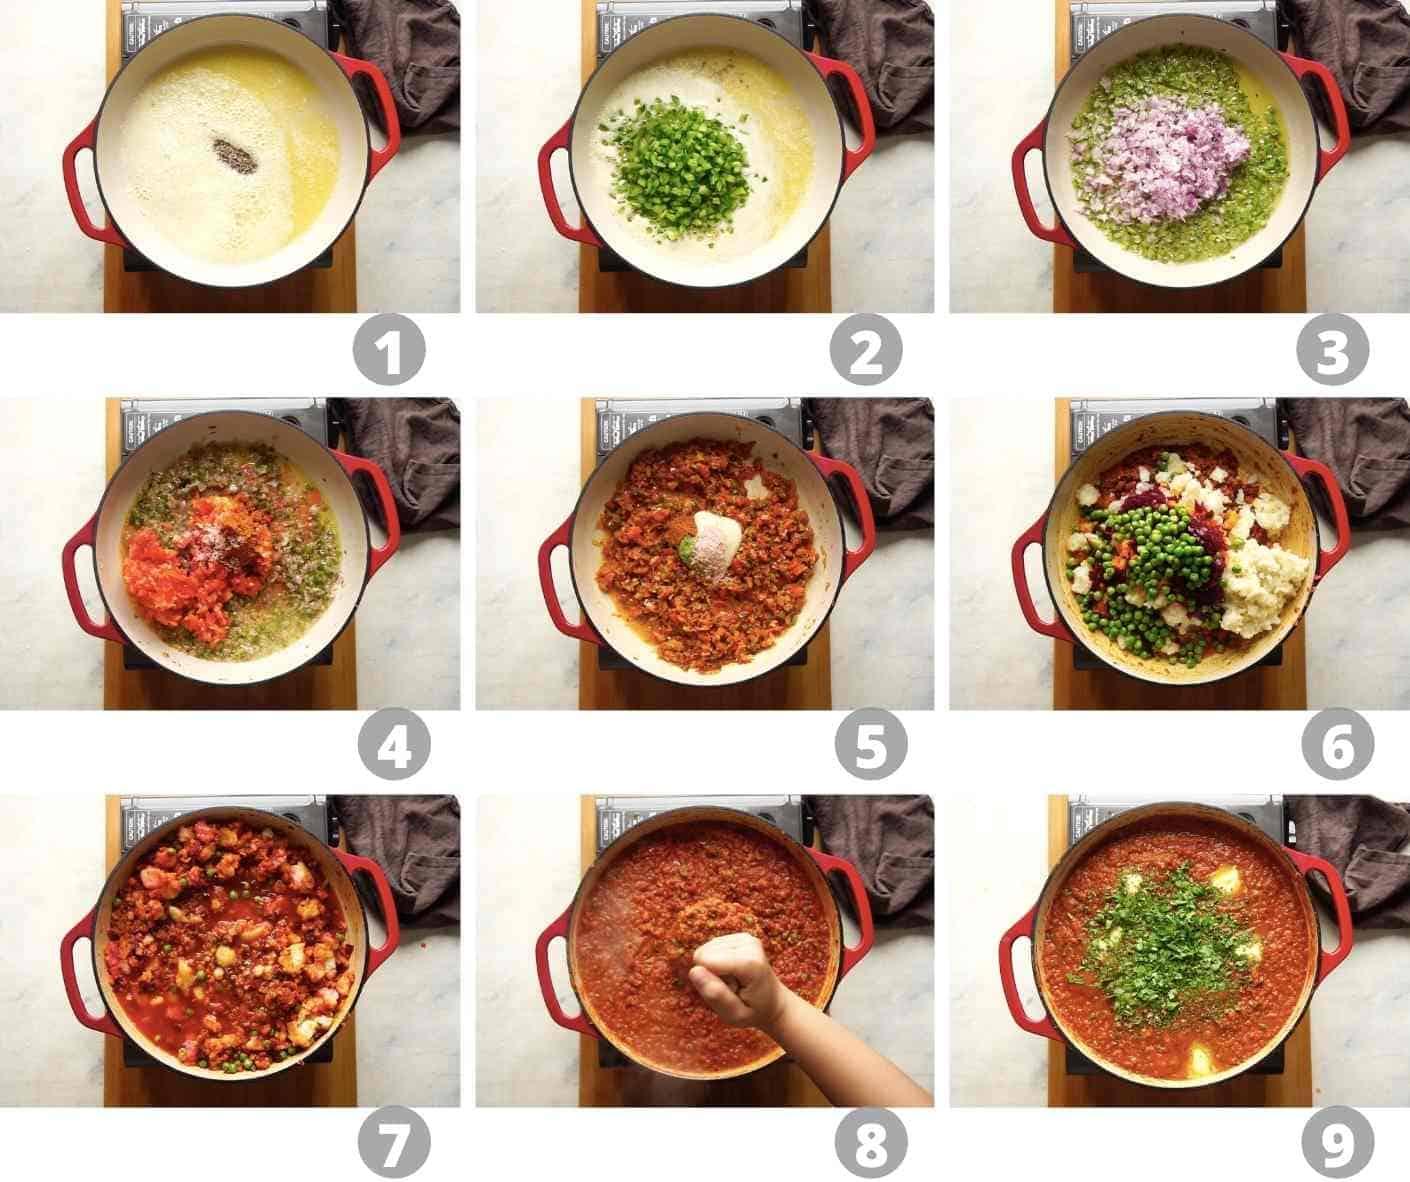
- Heat butter and oil in a wide skillet or pan and add jeera or cumin seeds
- Once the cumin seeds starts spluttering, add capsicum and saute for a few minutes. This first step helps infuse the flavour of capsicum in the dish
- Add onions and cook till they turn translucent and become soft
- Add tomatoes, some of the pav bhaji and salt. Mix and cook this covered till the tomatoes soften and spices are cooked
- Add the remaining spices – chilli powder, coriander powder, turmeric, more pav bhaji masala, garlic paste, green chilli paste and salt and saute this a few times to mix well. Cook the masala till you start seeing oil separating from the sides (watch the video)
- Add all the cooked vegetables and mix with the masalas
- Add a cup of water and mix well. Let the come to a simmer
- Start mashing the vegetables with a potato masher as you go. The vegetables will start absorbing water as they cook, so repeat step 7 and 8 twice – add more water and keep mashing till the texture is almost creamy but not smooth
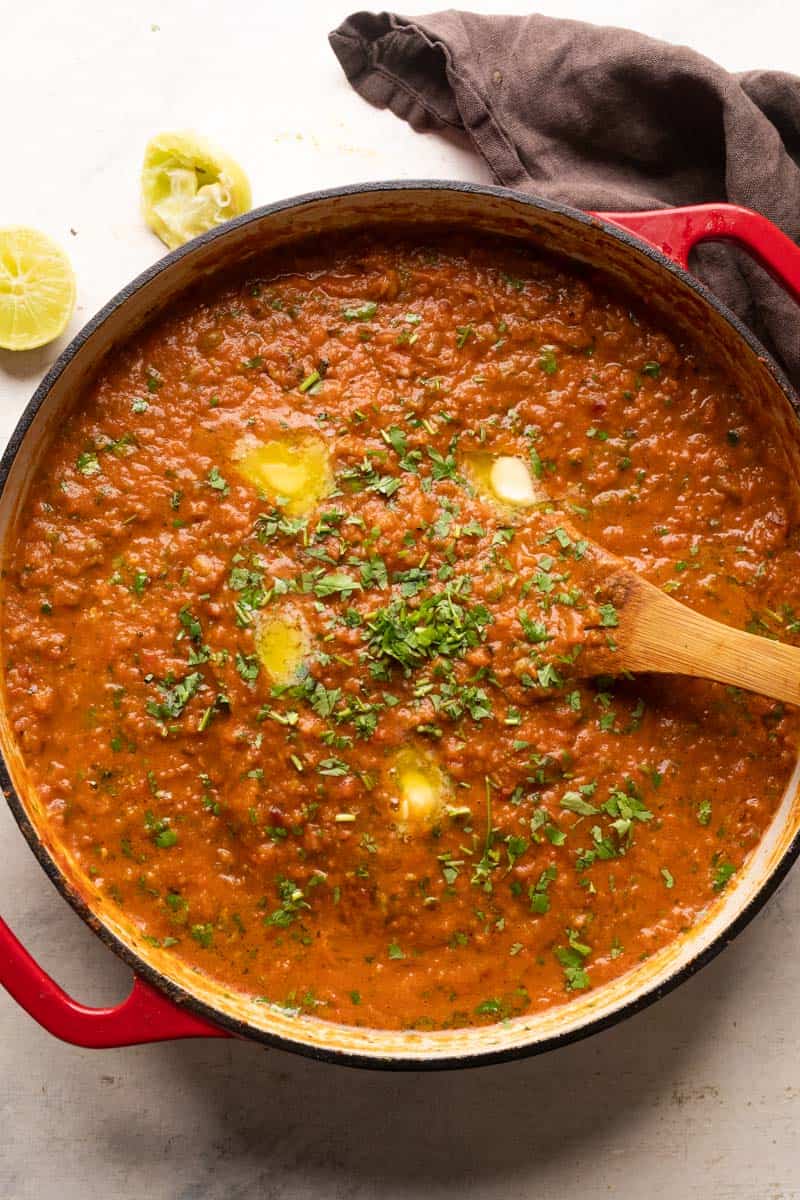
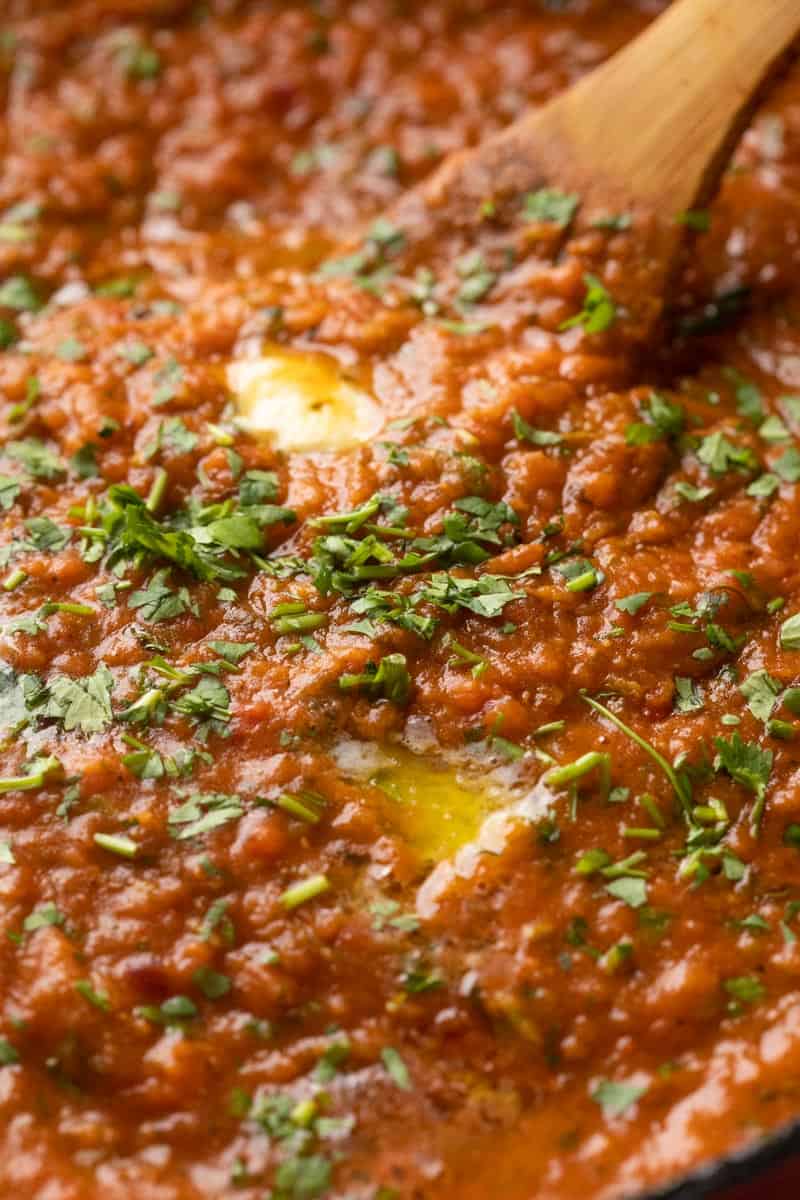
- Finish with more butter, kasuri methi, coriander and lime juice and serve hot off the pan!
This recipe does need some time, patience and prep work but the result is amazing. It also makes a large batch that’s enough for 6-8 people and that means you’ll always have leftovers. And trust me, day old bhaji tastes even better!
Richa’s Top Tips to make Pav Bhaji
Vegetables: I only recommend hardy vegetables like potatoes, carrots, capsicum, onions, beetroot and green peas for this recipe. A lot of people like to add cauliflower, but personally I don’t enjoy the flavour. If you really want to use cauliflower, use only 1/2 cup. Cauliflower has a strong flavour and can overpower the flavour of the pav bhaji if too much is used
Pav Bhaji Masala: If you are super ambitious, you can make your own pav bhaji masala, but with this recipe you can easily convert store bought pav bhaji masala (my favourite – Everest Masala) into stellar pav bhaji!
Natural Red Colour: A lot of pav bhaji vendors on the street use colour to give pav bhaji that distinct reddish orange colour. My secret ingredient is cooked beetroot which adds that perfect colour naturally
Use a wide, shallow dish: Pav Bhaji should be made in a wide, shallow dish. I’ve used a 14 inch shallow pan for making my bhaji in the video below. It makes sauteing and mashing much easier. A kadhai or wok is not the best for making this recipe
Add water in parts: Adding water in parts and mashing the vegetables as you go helps improve the flavour and makes it more homogenous. It’s also much easier to control the texture of the bhaji
Don’t skimp on butter: Please don’t skimp on the butter. This is not a healthy recipe and it really needs that butter for that perfect texture and taste
Serving Suggestions
Pav Bhaji tastes best when served with chopped onions, coriander, lime wedges and buttery ladi pav or mumbai style pav buns, which are also used for vada pav. But if you don’t have those, bread, dinner rolls, hawaiian rolls or even burger buns will work in a pinch! The point is, you don’t want to miss this recipe!
I really hope all you Pav Bhaji enthusiasts try this recipe and love it as much as I do!
Watch the Recipe Video

Pav Bhaji – Mumbai Style
Ingredients
- 2 Tablespoons Vegetable Oil
- 60 Grams Butter
- 1 Teaspoon Cumin Seeds, Jeera
- 2 Green Capsicum, finely chopped, approx 130 Grams
- 2 Onion, finely chopped, approx 150 Grams
- 5 Tomatoes, finely chopped, approx 360 Grams
- 4 Teaspoons Pav Bhaji Masala, divided
- 1 ½ – 2 Teaspoons Salt, divided
- 2 Teaspoons Kashmiri Red Chilli Powder
- 1 Tablespoon Coriander Powder
- ½ Teaspoon Turmeric Powder
- 2 Tablespoons Garlic Paste
- 2 ½ Tablespoons Green Chilli Paste
- 500 Grams Potato, boiled and mashed
- 2 Carrots, finely chopped and cooked, approx 110 Grams
- ½ Beetroot, finely chopped and cooked, approx 90 Grams
- ½ Cup Green Peas, cooked, approx 130 Grams
- 1 Teaspoon Kasuri Methi
- 1 Lemon, freshly squeezed
- 2-3 Cups Water, approx 500-750 Millilitres
- ½ Cup Coriander Leaves, chopped
- 60 Grams Butter
Instructions
- Add vegetable oil and butter to a large tawa or heavy bottomed pan and allow to heat on a medium high flame. Once hot, add cumin seeds and let it splutter. Add capsicum and saute for 5 minutes on medium flame or until slightly softened.
- Add chopped onion and allow to fry on medium flame for 6-7 minutes. Add chopped tomatoes, 2 teaspoons pav bhaji masala and 1 teaspoon of salt. Stir to combine, cover and cook on low heat for 8-10 minutes or until softened.
- Add chilli powder, coriander powder, turmeric powder, 2 teaspoons of pav bhaji masala, 1 ½ tablespoons of garlic paste, green chilli paste and ½ a teaspoon of salt. Stir and mix until combined. Cook on medium heat for 3-4 minutes or until the oil separates.
- Add mashed potato, carrots, beetroot and green peas. Stir to combine. Add 1 cup of water and mix well. Allow it to come to a boil and mash using a potato masher. Allow the bhaji to reduce and cook on a medium flame.
- Once the water gets absorbed, add another cup of water along with half a teaspoon of salt and repeat the mashing process. Ensure all the vegetables are fully cooked and mashed together.
- Taste and adjust the salt accordingly. You can add another cup of water if you like a more runny consistency, I used a total of 3 cups of water.
- Add butter, kasuri methi, ½ a tablespoon of garlic paste and ¼ cup of chopped coriander leaves and stir to combine. Simmer it for 1-2 minutes or until butter has melted through. Once it melts, add lemon juice and the remaining coriander leaves, stir to combine. Serve hot along with chopped onion, lemon wedges and hot toasted pav!


Kintaro red chili oil is the purest and natural form of red colour. Kintaro is prepared by infusing kashmiri chili in the pure sesame oil. The filtered red coloured oil gives natural red colour in seconds. Kintaro has zero pungency so it can be enjoyed by everyone. Kintaro is there where red colour is required.
Hats off to your patience
Hehe, thanks a lot Lakshmi.
Pav bhaji has a special place in my heart since I’m from Mumbai and I’ve always struggled to make it the authentic Mumbai style. But this recipe is fantastic! The color, the flavour, the texture, everything is perfect! Has definitely become a house favorite! Must try!
Looks really yummy. I didn’t know about the beetroot part. I used to always think how to add color as I don’t use the artificial color. Thank you it was very much helpful.
Love your tips. Thanks again.
Thanks Navita
Very nice Women day cake recipe
This is the 2nd recipe from your food blog that I’m trying in a week ‘s time and I’m certainly coming back for more. I’ve made pav bhaji enough number of times but would still crave Bombay pav bhaji. This recipe is as close as it gets to Bombay pav bhaji. I added 4 cups of water and before adding the last cup, cooked it a fair bit on medium flame. This recipe is a keeper! Thanks Richa!!
Your food blog is one of the best. I make pav bhaji, but never get the taste of the roadside Mumbai food stalls. When I tried your recipe, I couldn’t believe how close it came to the taste I am used to from Mumbai. That too in the first take. It turned to be easy to make and delicious. Thanks a lot Richa.
Wohoooo! Thanks so much Anu
Thank you for this recipe, I have seen variations for this from some of my friends from Mumbai, Will make this for thanksgiving!
Question: do you think adding a second tadka or just sautéed golden brown garlic and Kashmiri mirch will add to the taste? I feel like i might not get beetroots, but i can add desi mirch and garlic tadka at the very end before sprinkling dhaniya garnish on top.
Hey Harsh! This would be brilliant for thanksgiving. A second tadka would be amazing – go for it. I hope you enjoy the recipe
Could not find Dragon Chicken recipe. Thank you
Here you go: https://myfoodstory.com/dragon-chicken/