Mumbai Ladi Pav | Eggless Dinner Rolls
on Oct 01, 2021, Updated Oct 14, 2021
This post may contain affiliate links. Please read our disclosure policy.
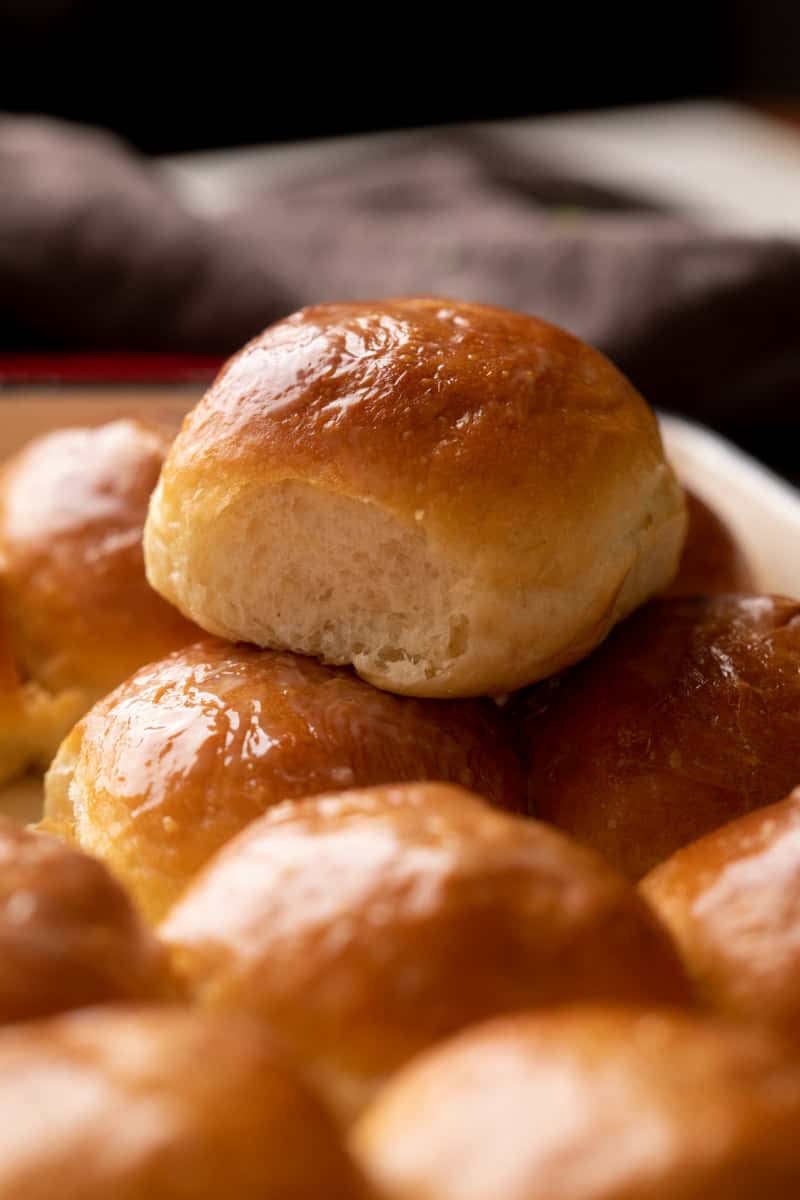
Mumbai Ladi Pav is the perfect vehicle to mop up buttery hot pav bhaji and to make vada pavs. They are basically eggless dinner rolls, but much softer than their American counterparts. Use them as a side dish, or for breakfast with eggs – these are amazing!
We call them ladi pav, the Americans call these dinner rolls and somewhere else they are just called buns or bread rolls. Whatever name you use, these will absolutely blow your mind because they are:
- Incredibly soft and fluffy
- Beautifully golden on top
- Buttery and rich
- Melt in your mouth delicious and the perfect side dish for stews, gravies, pav bhaji, misal pav or sandwiches
What is Ladi Pav
Ladi Pav basically translates to buns (pav) in one single line (ladi). They get their name from the way they are baked which is in a large baking pan with multiple lines (ladis) of bread (pav). I think they originated in Bombay where they are baked fresh in bakeries in large aluminium trays and are used throughout the day.
You can start your day with bun maska and cutting chai, have a vada pav as a snack and then have pav bhaji for a meal. I can live on these!
How to make Ladi Pav + Ingredients
Here’s everything you need to make this recipe. This recipe only needs 7 ingredients.

- All Purpose Flour (Maida): The base ingredient for most bread recipes. Helps keep the bread soft and develops gluten. You can use a combination of whole wheat flour (atta) and all purpose flour (maida) but I don’t recommend using more than 30% whole wheat flour because it’ll make these pavs too dense
- Sugar: Food for the yeast and flavour for the bread. It helps activate yeast. You won’t get the same results if you don’t use sugar
- Yeast: I’ve used Active Dry Yeast in this recipe. Like the name says, it needs to be activated in lukewarm water or milk and sugar. Takes between 5-10 minutes to activate. You can also use the same quantity of instant yeast but the rise times may differ slightly
- Butter: These dinner rolls are buttery because of the butter. My butter of choice – salted Amul butter for this recipe
- Milk Powder: Helps make the best soft, adds flavour and fat
- Milk: Milk makes a softer dough, adds sugar, fat and liquid to this recipe. Can be replaced with water but the results will be slightly different. Milk is also used in this recipe as a wash to brush the dough before baking. This helps give the buns their distinct golden brown colour on the top
- Salt: Flavour flavour flavour because there’s no flavour without seasoning
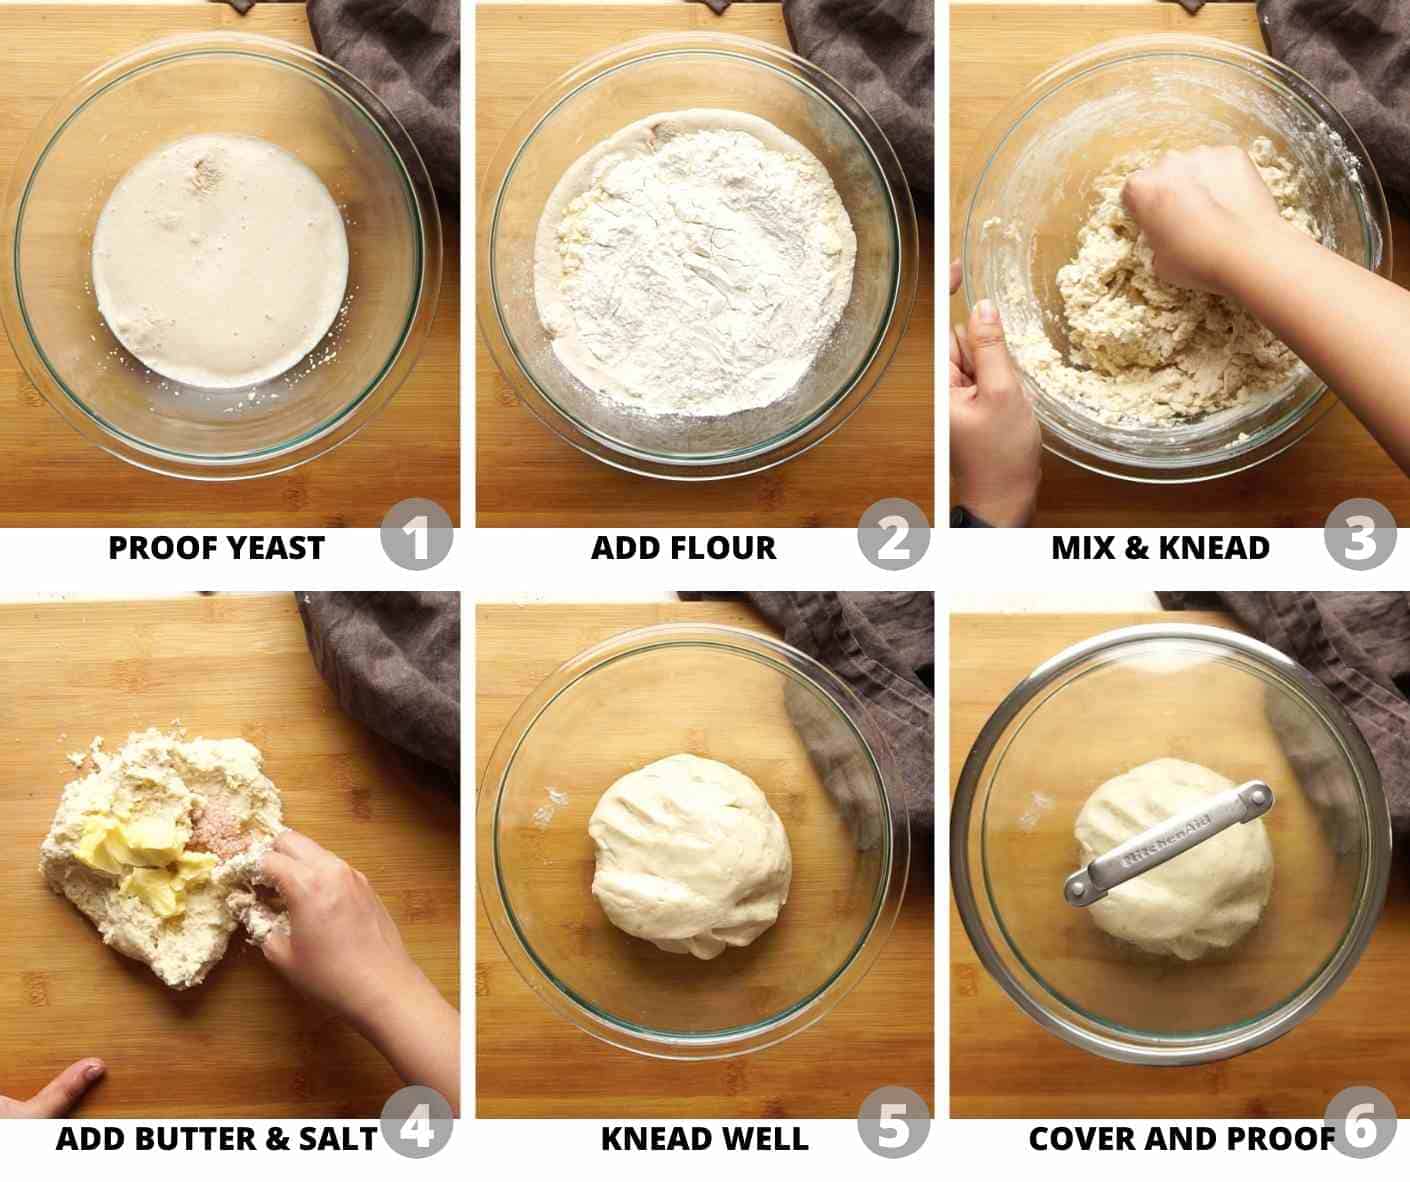
- Proof Yeast: Proof yeast in a mixture of luke warm milk and sugar. This helps activate the yeast. The yeast will start to froth and form small bubbles in 5-10 minutes which is a sign thats its active. If your yeast is too old, the dough won’t rise and it’ll lead to hard, dense bread so this is a good test to see if yeast is alive
- Flour: Add all purpose flour and mix well. Knead for a few minutes (around 4-5 mins) till the bread starts coming together. This helps form gluten in the bread. This dough is extremely sticky because there is a lot of liquid (which is what gives it that soft, fluffy texture) so use a bench scraper or a very blunt knife to scrape the dough off your hands and pull it together
- Add Butter and Salt: Transfer the dough to the kitchen counter and add butter and salt. The reason that butter and salt are added later is because salt can slow down yeast activity and prevent gluten from forming. This delayed addition helps keep the yeast active. The dough will start to feel very tacky and sticky again. Use a bench scraper as you knead to scrape the dough and bring it together
- Knead: Knead for another 10 minutes (total kneading time about 15 minutes including step #2 and #3) till you start to feel the dough come together and become less sticky. Rub a little oil on your hands if you need as you knead
- Cover and Proof: Once the dough is well kneaded, place it into a bowl brushed with oil. Roll the dough in oil so that it doesn’t form a crust while proofing. Cover and proof till it doubles in size. This can take anywhere between 1-3 hours depending on where you live. Dough proofs faster in warm climates and takes longer in cold climates
You can also proof the dough in an instant pot which will do the job in 30 minutes! Read my tutorial to proof bread in an Instant Pot
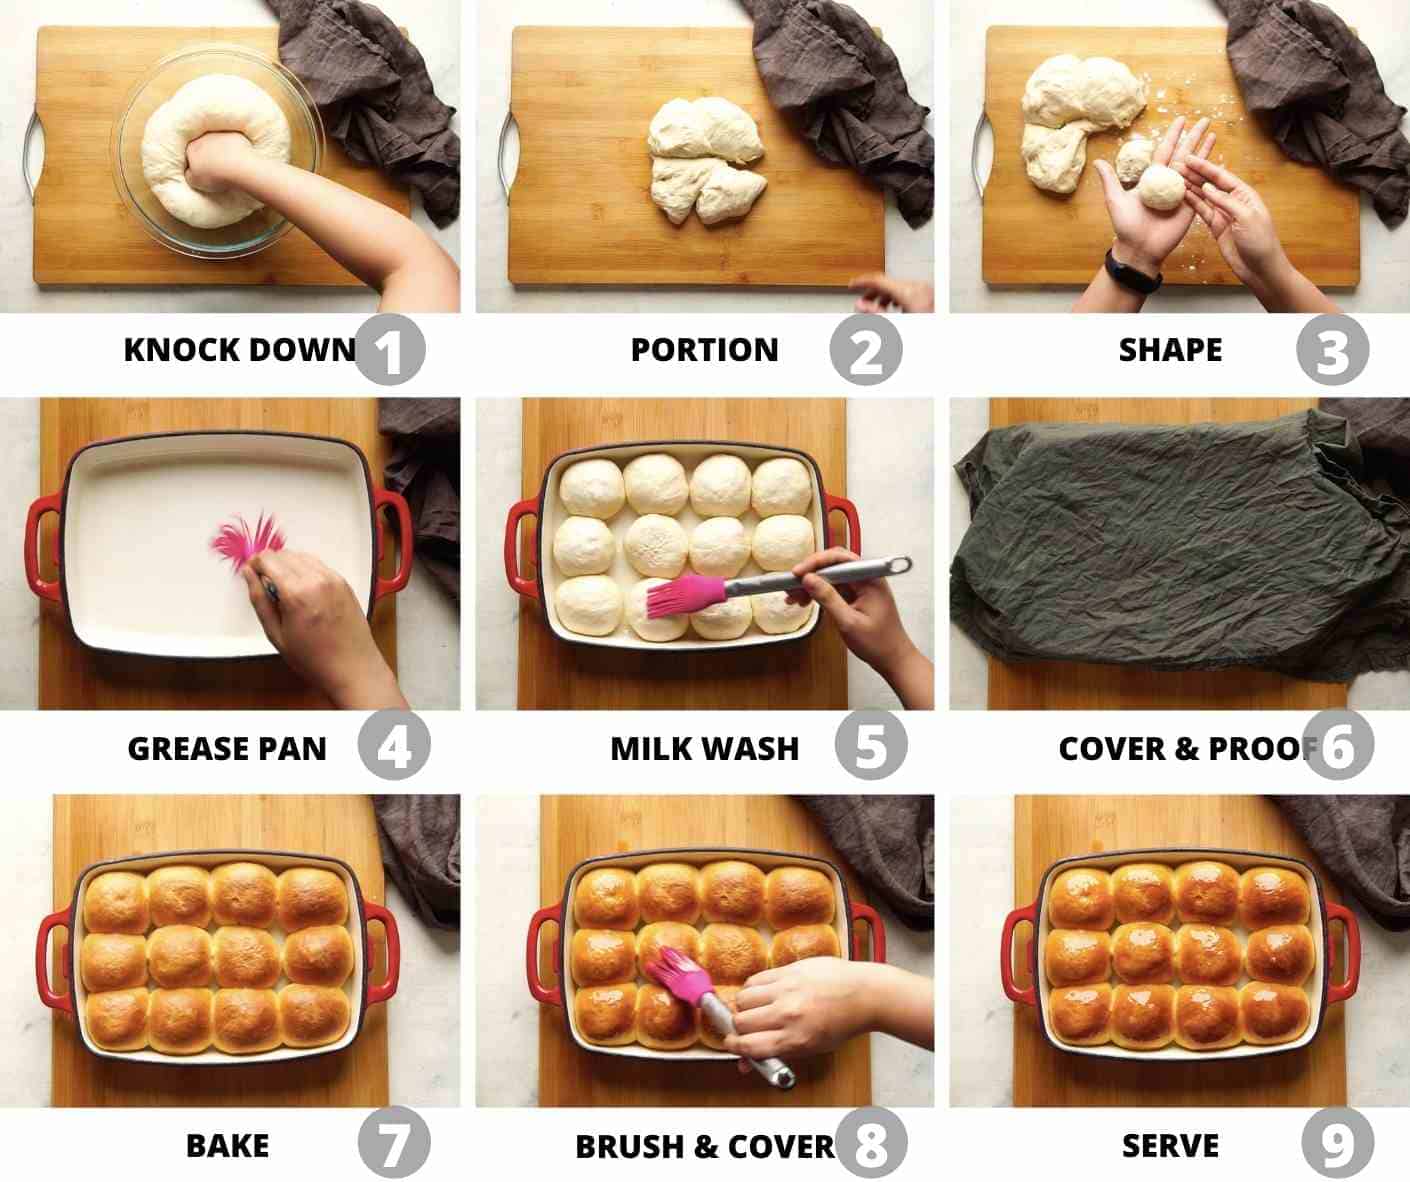
- Knock it down: Once the dough has doubled in size, knock it down to release all the air
- Portion: Portion the dough out into 12 parts. I recommend using a weight scale to do this so that you get equal sized pavs or bread rolls
- Shape: Shape them into balls by pulling the sides tightly and tucking them into the bottom. This will help give you smooth tops. Then rotate the balls lightly on your palm using the index finger and thumb of the other hand to form a round ball.
- Grease Pan: Brush your baking pan with melted butter. It’s important to use the right sized baking pan so that the dough balls touch each other as their proof and then bake. This is what makes them ‘ladi pav’
- Milk Wash: Place the balls into the baking pan in such a way that there is some place between them which will fill up as they rise and then brush with milk
- Cover and Proof: Cover with a wet cloth and allow them to proof for 30-60 minutes till they almost double in size. It’s important to keep an eye on them at this stage because over proofing can result in collapsed pavs.
- Bake: Do another round of milk wash and then bake in a preheated oven for 15-20 minutes till the tops are an even golden brown
- Brush & Cover: Once baked, brush the buns immediately will melted butter. The melted butter will seep through and add so much flavour and make the bread soft. Cover once more with a wet cloth for 5 minutes. This makes the buns really soft
- Serve with pav bhaji or turn them into vada pavs. These are fabulous!
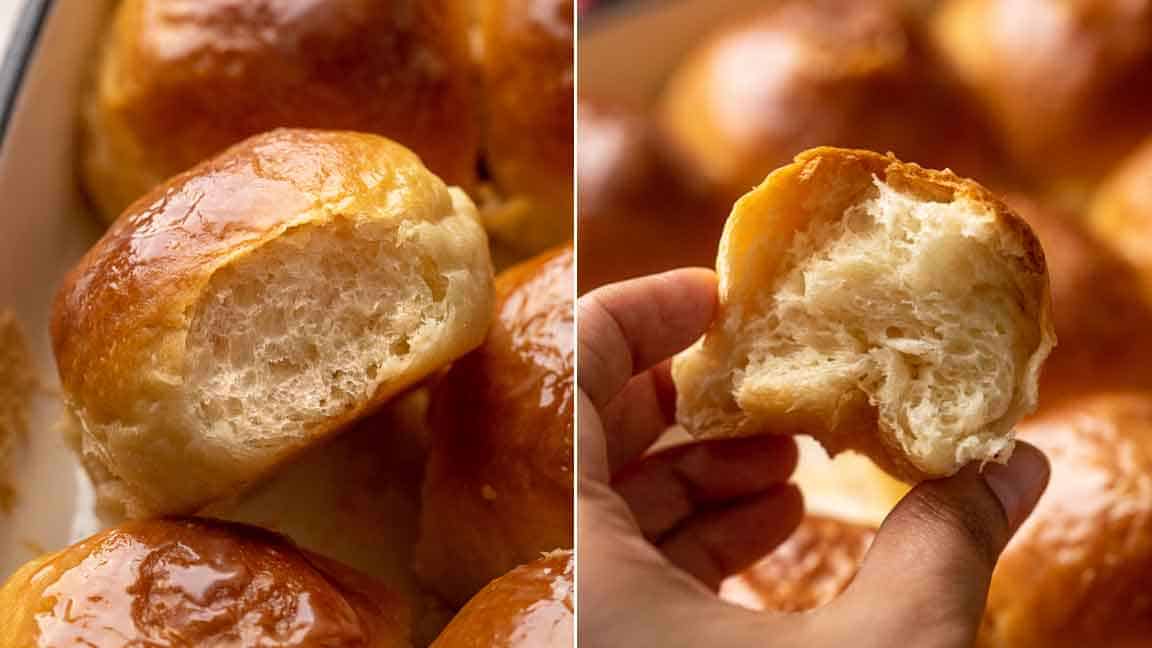
These ladi pavs are unreal! The texture is soft, the crumb is airy and the top is a deep golden brown. I make them all the time, even if it’s just for an evening snack. They also make fantastic road trip food and you can turn them into sandwiches.

Richa’s Top Tips to make the best Ladi Pav
Make sure yeast is active: This is the first step and the first test. Make sure you are using good quality yeast. In India brands like eagle or butterfly don’t have consistently good yeast. I recommend Urban Platter Active Dry Yeast. Activate the yeast to make sure it’s alive and kicking!
Don’t be scared of the dough: This is a high hydration dough which means its got a lot of liquid in it. Which makes it sticky and tacky and difficult to handle. Invest in a bench scraper or use a really blunt knife (one you know will not hurt you) and use it to scrape the dough off the counter and your hands as you knead it
Use a stand mixer: I’ve mixed the dough by hands in this video because I wanted to show you how to its done, but if you have a stand mixer, then use it. That’ll make it so much easier to knead this dough
Don’t use too much flour: Stick to the measurements in the recipe. You’ll be tempted to add more flour because the dough will feel sticky, but don’t. The more extra flour you add, the more dense your pavs will be. For that perfect crumb and really soft ladi pav don’t add extra flour while kneading
Knead well: If kneading by hand, it’s important to knead the dough for 15 minutes till it starts to come together into a ball and it isn’t sticky but remains slightly tacky. If using a stand mixer, 10-12 minutes should do it
Shape tightly: Use the shaping technique shown in the video below to shape your balls tightly before baking. This will ensure a smooth top which doesn’t have any bumps and very even looking dinner rolls
Use the right baking pan: The size of the baking pan is very important. For this recipe we’ve used a 11 inch x 7 inch baking dish which fits 12 pavs perfectly. Each pav is placed at a distance of 1/4 inch from each other to give them space to rise, in a way that once they bake, the buns are sticking to each other. This gives them the right height and they don’t spread too much or become too flat
Preheat your oven: This is more important than everything else. Bread rises properly when it hits a hot oven. Make sure to preheat your oven for 15-20 minutes so that the initial heat gives the dough the lift it needs to bake properly. Place the pan in the middle rack with both elements on
Every single time I make these, I’m amazed at how well they turn out! You can also use this same recipe to make burger buns or stuffed buns. For eggless burger buns, place them on a baking tray lined with parchment, at least 1.5 inches apart so that they don’t stick to each other. You can also sprinkle sesame seeds on top for the perfect looking burger buns.
Watch the Video

Ladi Pav
Ingredients
- 200 Millilitres Milk, lukewarm (38C – 42C)
- 2 ½ Teaspoons Active Dry Yeast
- 1 Tablespoon Sugar
- 250 Grams All Purpose Flour
- 2 Tablespoons Milk Powder
- 20 Grams Butter, softened
- 1 Teaspoon Salt
- 1-2 Teaspoons Oil
- 3 Tablespoons Milk, for brushing
- 30 Grams Butter, softened, for brushing
Instructions
- Add milk, sugar and yeast to a bowl and mix well. Allow to sit for 10 minutes or until frothy. You should be able to see some bubbling activity at the top surface. If this does not happen then do not continue with the recipe as it means that the yeast is not alive. The bread dough will not rise in this case.
- Add flour and milk powder to a mixing bowl. Make a well in the middle and add the milk yeast mixture. Once combined, transfer the dough to the counter and knead for 5-10 minutes or until the dough comes together as shown in the video.
- The kneading process will be sticky initially but the dough will come together. Add butter and salt and continue kneading for a few more minutes.
- When the dough has almost come together, rub about a teaspoon of oil between your palms and shape the dough into a ball.
- Transfer this into a large mixing bowl greased with the remaining oil. Also grease the dough with some oil as shown in the video. Cover and allow the dough to proof for an hour.
- Divide the dough into 12 portions of about 45 grams each. Shape them into small balls and place them in a pan greased with butter. Ensure that there is space between the dough balls.
- Cover with a wet cloth and allow to proof for an hour.
- Lightly brush the pav buns with milk. Bake in a preheated oven at 180C for 30-35 mins
- Remove from the oven once done and brush with melted butter. Cover again with a wet cloth for 5 minutes. Remove from the pan once cool and serve hot and toasted with bhaji.
Video
Notes
- The time it takes for your dough to rise will vary according to the conditions in which it is resting. This includes:
- Temperature – ideal temperature 80F/27C – 90F/32C
- Humidity – 60 to 80 percent humidity
- Tips on how to toast the pav:
8-10 Pieces Pav
2-3 Tablespoons Butter
½-1 Teaspoon Bhaji
1 Teaspoon Coriander Leaves, chopped, divided
Toast on medium flame for 1-2 minutes or until lightly toasted and golden brown.
Serve immediately along with hot bhaji, chopped onion and slices of lemon.
Very easy to follow recipe and gives the best results. Softest, nicest pavs that are so much better than the market ones.
Wohoo, Thanks Pallavi, am so so glad you liked the recipe.
Very nice Women day cake recipe
Amazing Recipe. Thank you for sharing.
This is the best recipe that I have ever tried so so much better than the market ones. Do follow her exactly and you will be overwhelmed to see the amazing results. Everyone at my place just went crazy over these cotton soft cute edible pillows.
Yaaay!! Thanks Richa