Bhuna Masala | Master Curry Paste
on Feb 10, 2016, Updated Sep 04, 2023
This post may contain affiliate links. Please read our disclosure policy.
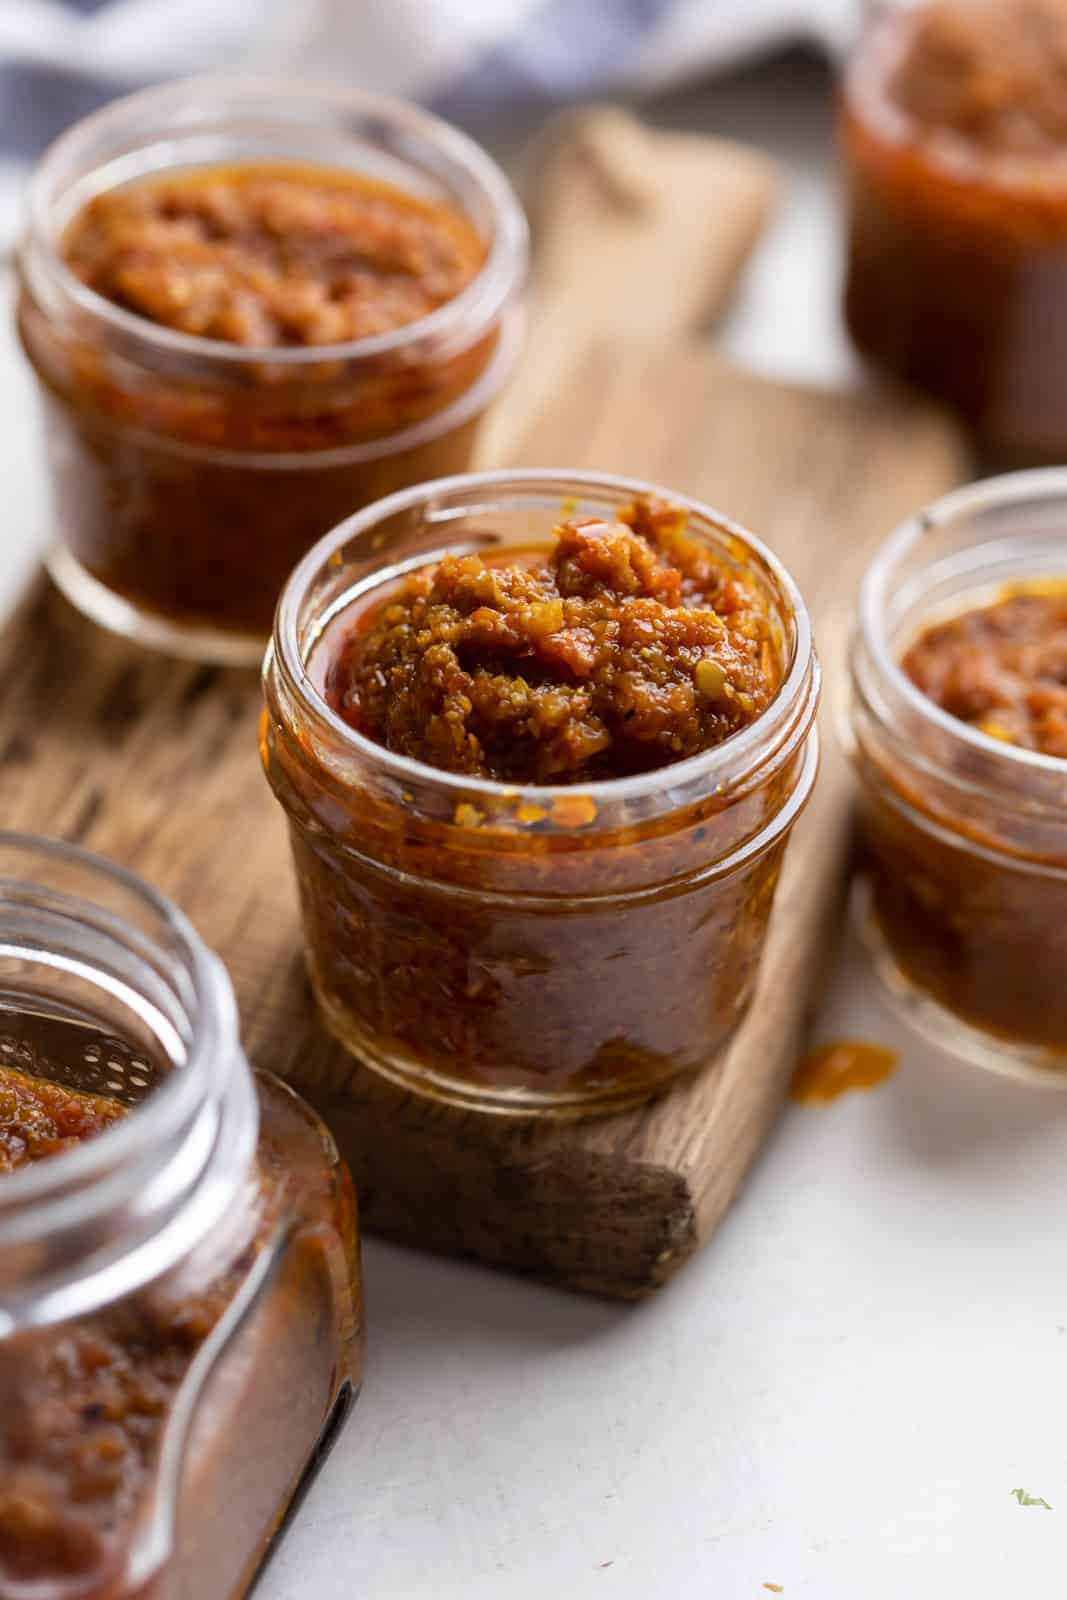
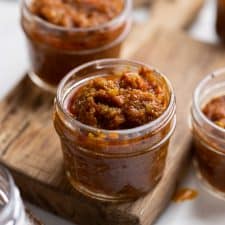
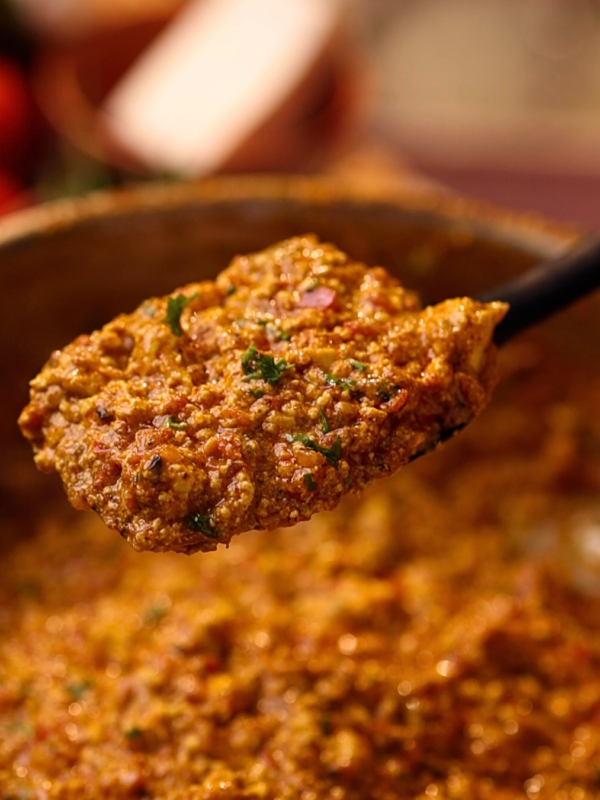
This Bhuna Masala, Master Curry or Everyday Indian Curry Paste is prepared using tomatoes, onions and lots of Indian spices! It is the base for most north and south Indian curries and is perfect for when you want to ace that curry in a hurry!

If there’s one thing that makes weeknight Indian cooking a breeze, it’s having a batch of Bhuna Masala tucked away in the fridge or freezer. Think of it as your all-purpose Indian curry base that forms of the backbone of countless dishes (scroll down for three awesome recipes!).
Made by slow cooking onions, tomatoes, ginger, garlic, chillies, and a handful of spices, bhuna masala or master curry is a complete flavor bomb and my personal secret to fast and delicious weeknight cooking! Whether you want to whip up a quick dal, paneer curry, chicken curry, or even a simple veggie sabzi — this base has your back. Make a big batch once, freeze it in portions, and future-you will be very grateful.
Jump to section: bhuna masala
Bhuna Masala Ingredients
- Fat: We use both oil and ghee for this recipe to add richness and aroma. I have used sunflower oil, but any neutral oil with a high smoke point (canola, peanut, vegetable, rice bran, etc.) will work.
- Spices: This recipe calls for basic Indian spices. Jeera (cumin seeds), red chilli powder, turmeric powder, coriander powder, cumin powder, and garam masala for flavor, depth, and color.
- Aromatics and veggies: This recipe calls for a lot of onions, tomatoes, ginger, and garlic as they form the base of this bhuna masala recipe. I would recommend using red onions and small desi tomatoes as for the best flavor.
- Chillies: I have used green chillies, but you can use serrano peppers if you live outside India. Feel free to adjust to taste.
- Cashews: Soaked in warm water and blended for a naturally creamy texture.
- Salt: For seasoning.
Frequently Asked Questions
It’s a multi-purpose curry base used for Indian curries, dals, sabzis, and stir-fries. It works with both vegetarian and non-vegetarian dishes.
Yes! It is essentially an onion-tomato curry base with added aromatics and spices. Bhuna refers to the slow cooking technique that deepens the flavour.
Oil helps the masala bhuno correctly, prevents burning, and extends shelf life. If using later in curries, you can always spoon off some excess.
Place in the fridge overnight, or thaw for 10–15 minutes at room temperature. In a hurry? Add it directly to a hot pan and it will melt quickly!
How to Use Bhuna Masala
Bhuna masala is one of the most versatile staples you can keep in your kitchen, simply because it works as the foundation for so many Indian dishes. It’s the easiest way to instantly adds depth and body to curries and make everything taste restaurant style with almost zero effort. Use it to make dals, paneer dishes, chicken curries, egg curry, mixed veg sabzi, biryani gravies, or even masala rice on busy days. A few spoonfuls can transform simple ingredients into a flavour-packed meal, which is why having it prepped and frozen makes everyday cooking faster, easier, and infinitely more delicious.
To help you get started, I have shared three amazing recipes that you can make with bhuna masala below – dal fry, matar paneer, and mix veg sabji (scroll down for full recipes!).
Richa’s Top Tips
- If you’re vegan, feel free to skip ghee and make the recipe with just oil. It will still taste delicious.
- I have used my homemade garam masala powder for the most depth of flavor and I highly recommend making a batch. However, you can use store-bought in a pinch.
- The flavour of bhuna masala comes from long, patient cooking, so don’t rush the onions. Let them slowly deepen in colour.
- Use a heavy-bottomed pan to prevents the masala from burning during the long cooking stages.
- Be generous with the oil. This is what helps the onions caramelise and also ensures a long shelf life.
- Allow the oil to separate at each stage of the cooking process as that’s the most reliable sign that everything is cooked through.
Storage Tips
- Refrigerator: Lasts beautifully for up to 5 days in an airtight container.
- Freezer: Freezes for up to 3 months without losing flavour.
- Portioning tip: Freeze in ½ cup portions so you only defrost what you need — perfect for single meals or small-batch cooking.
- Ziplock vs. jars: Ziplock bags freeze flat and stack well. Small jars work when you want neat portions to thaw one at a time.
Customisation Tips
- Add a little more ginger and garlic each while preparing the curry. The fresh ginger and garlic give it an extra kick. Keep in mind, our masala already has a strong flavour of ginger and garlic, this little extra is for hardcore fans like me.
- For South Indian curries, a tempering of mustard seeds, cumin seeds and curry leaves is ideal. Prepare this tempering before adding the masala.
- Add additional green chillies or crushed black peppercorns while sautéing the bhuna masala for a spicy curry. Alternatively, you can also add red chilli powder.
- Adding a pinch of hing (asafetida) in the beginning will give it that extra kick of umami.
- Add coconut milk with your veggies or protein for a creamy korma like flavour. You can even add cream or hung curd for a smooth texture.
Watch Bhuna Masala Recipe Video
Bhuna Masala or Everyday Indian Curry Paste
Ingredients
- 6 tablespoons sunflower or any neutral cooking oil
- 1 tablespoon ghee, optional
- ½ tablespoon jeera, or cumin seeds
- 1 kg red onions, peeled and cut into four parts
- 50 grams garlic, peeled cloves
- 50 grams ginger, peeled and roughly chopped
- 4-5 green chillies or serrano peppers, adjust to taste
- 750 grams tomatoes, cut into four parts
- ¼ cup cashews, soaked in 3 tablespoons warm water
- 1 tablespoon chilli powder
- 1/2 teaspoon turmeric powder
- 2 tablespoons coriander powder
- 1 teaspoon cumin powder
- 1 teaspoon garam masala
- 1 teaspoon salt
Instructions
- To prep the veggies, add onions, ginger, garlic and green chillies to a food processor or mixer grinder, and chop till it resembles a coarse chop. Remove this mixture in a bowl, and add tomatoes and grind them to puree.
- Grind cashews with the water they were soaked in, to a smooth paste and set aside.
- In a large pan or kadhai, heat oil and ghee and add cumin seeds. Once the seeds start spluttering add onion mixture.
- Cook stirring occasionally on high for 7 minutes, 8 minutes on medium and cook on low for 40-45 minutes till the onion mixture turns brownish in colour and oil separates from the sides (as shown in the video above).
- Add tomato puree, salt and all the remaining spices and cook on high heat while stirring continuously for two minutes. Reduce the flame and cook for another 25-30 minutes with the lid on, till the mixture reduces a little, and you can see oil start to appear on top.
- Add cashew paste, mix and cook covered with the lid on low heat for 15 minutes till the oil separates from the sides and take off the heat. This recipe yields approx. 2 ½ cups + 2 tablespoons of bhuna masala.
- Use this as a base for curries and stir fries. To store for later, cool completely before transferring into ziplock bags or freezer friendly food safe storage containers.
- Bhuna Masala stays in the fridge for up to 5 days or in the freezer for up to three months.
Notes
- Prepping Veggies: You can alternatively chop the veggies finely instead of using the food processor
- Refrigeration: Bhuna Masala can be stored in the fridge for up to 5 days
- Freezing: Bhuna Masala can be frozen for up to 3 months
- Storage: I prefer storing 1/2 cup bhuna masala in small jars and then freezing them. This way I only have to thaw the required amount every time I want to use it

Nutrition
How to Use Bhuna Masala
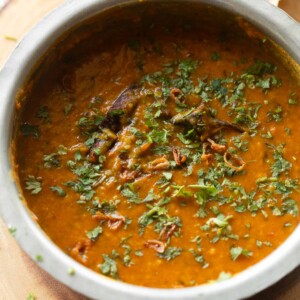
1. Dal Fry
Using bhuna masala for dal is the easiest way to turn a simple pot of lentils into something rich, comforting, and full of flavour. The caramelised onions, tomatoes, and spices bring instant depth. Add a squeeze of lemon or a sprinkle of coriander on top, and you’ve got a dal that tastes like it simmered for hours. My favorite to serve this is poured over jeera rice, along with some stir-fried potatoes, lachha pyaaz, and achar on the side.
Dal
Ingredients
For cooking dal
- ½ cup tur dal, washed and soaked for 30 minutes
- ¼ teaspoon salt
- ¼ teaspoon turmeric powder, haldi
- ½ teaspoon groundnut oil or any neutral cooking oil
- 1 cup water
For dal bhuna masala (check the order with Richa??)
- 1 teaspoon sunflower or any neutral cooking oil
- ½ teaspoon cumin seeds, jeera
- ¼ teaspoon asafoetida, hing
- 2 red chillies, whole
- 1 green chilli, finely chopped
- ½ teaspoon turmeric powder
- 1 teaspoon kashmiri chilli powder
- ¼ cup bhuna masala, MFS link
- ¾ teaspoon salt
- ¼ cup water
- 2 tablespoons finely chopped coriander leaves
Instructions
- Add soaked dal to a pressure cooker with salt, turmeric powder, oil & water. Cook on high until the 1st whistle & on low for 5 minutes and take off the heat. Let it depressurise by itself.½ cup tur dal, ¼ teaspoon salt, ¼ teaspoon turmeric powder, ½ teaspoon groundnut oil or any neutral cooking oil, 1 cup water
- Heat oil in a pan or kadai, add cumin seeds and once they crackle, add hing, red chillies & saute for a few seconds till fragrant.1 teaspoon sunflower or any neutral cooking oil, ½ teaspoon cumin seeds, ¼ teaspoon asafoetida, 2 red chillies
- Add green chillies and saute for a few seconds.1 green chilli
- Add turmeric powder, chilli powder, saute for a few seconds. Add bhuna masala, ¾ teaspoon salt, ¼ cup of water & saute for 2-3 minutes till oil floats on top.½ teaspoon turmeric powder, 1 teaspoon kashmiri chilli powder, ¼ cup bhuna masala, ¾ teaspoon salt, ¼ cup water
- Add cooked dal and simmer for 4-5 minutes till the dal absorbs the masalas.
- Garnish with chopped coriander leaves and serve.2 tablespoons finely chopped coriander leaves
Nutrition
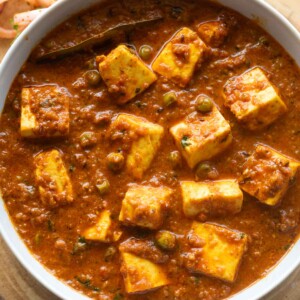
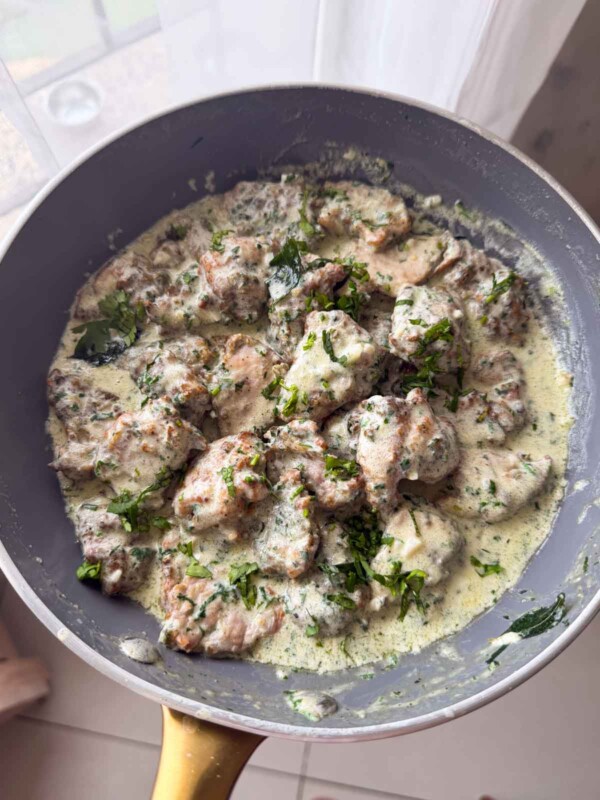
2. Matar Paneer with Bhuna Masala
Matar paneer becomes a true weeknight hero when you use bhuna masala as the base. The slow-cooked masala already has layers of flavour, so the gravy naturally turns out rich and restaurant-style with minimal effort. Plus, you can customise by replacing paneer with chicken or prawn, or add more veggies. It goes so well with rotis, parathas or a bowl of steaming rice.
Matar Paneer made with Bhuna Masala
Ingredients
- 1 tablespoon sunflower or any neutral flavoured cooking oil
- ½ teaspoon jeera
- 1 bayleaf
- ¼ teaspoon turmeric powder
- 1 teaspoon coriander powder
- ½ teaspoon red chilli powder
- ½ cup + 2-3 tablespoons water
- ½ cup bhuna masala
- ¼ cup curds, whisked
- ½ teaspoon salt
- ½ cup green peas
- 200 grams paneer, cut into 1 inch cubes
- 1 teaspoon kasuri methi, roasted & crushed
- 2 tablespoons fresh cream
- 2 tablespoons finely chopped coriander leaves
Instructions
- Heat oil in a pan or kadai, add bay leaf, jeera and once it crackles, add turmeric powder, coriander powder, red chilli powder and saute for a few seconds. Add 2-3 tablespoons of water to avoid the burning of masalas.1 tablespoon sunflower or any neutral flavoured cooking oil, ½ teaspoon jeera, 1 bayleaf, ¼ teaspoon turmeric powder, 1 teaspoon coriander powder, ½ teaspoon red chilli powder, ½ cup + 2-3 tablespoons water
- Add bhuna masala, ½ cup of water, salt, cover and cook for 2-3 minutes. Add curds and saute for 2-3 minutes till the curds are cooked.½ cup bhuna masala, ¼ cup curds, ½ teaspoon salt
- Add green peas & cover and cook for 6-7 minutes. Add paneer, kasuri methi and cook for 2-3 minutes. Add fresh cream, coriander leaves and serve.½ cup green peas, 200 grams paneer, 1 teaspoon kasuri methi, 2 tablespoons fresh cream, 2 tablespoons finely chopped coriander leaves
Nutrition
3. Mixed Veg Sabzi with Bhuna Masala
I love making this mixed veg sabzi on fridge clean out days. Because believe me, this mixed veg sabzi made with our bhuna masala is the most delicious way to consume wilting veggies 😛 ! The bhuna masala clings beautifully to the vegetables, turning an everyday mix veg into something vibrant and flavourful. Again, customise with your choice of protein, swap it for whatever veggies you like and have available. Once you realise how it is to make a delicious veg sabji with bhuna masala, you’ll always keep this one in your backpocket!

Mix Veg with Bhuna Masala
Ingredients
- 1 carrot, cut into ½ inch long pieces, ¼ cup
- 3 green beans, cut into 1 inch long pieces, ¼ cup
- 6-8 large cauliflower florets, ⅓ cup
- 3 baby corns, cut into 1 inch long pieces, ⅓ cup
- ½ onion, cut into cubes, ¼ cup
- ¼ capsicum, cut into cubes, ¼ cup
- 1 ¾ cups water, divided
- ¾ teaspoon salt, divided
- 1 ½ teaspoons sunflower or any neutral cooking oil
- 1 inch ginger, julienned
- 1 teaspoon sliced garlic
- 1 green chilli, finely chopped
- ¼ cup bhuna masala, MFS link
- ½ teaspoon kashmiri chilli powder
- 1 teaspoon kitchen king masala
- ⅛ teaspoon garam masala powder
- ¼ teaspoon kasuri methi, roasted & crushed
- 2 tablespoons of fresh cream
- 2 tablespoons finely chopped coriander leaves
Instructions
- Boil 1 ½ cups of water with ¼ teaspoon salt, Add veggies- carrots, beans, cauliflower, baby corn and cook them for 8-10 minutes till they are cooked but firm & crunchy and not mushy. Overcooked veggies do not taste good in this recipe.
- Heat oil in a pan or kadai, add ginger, garlic & green chilli and saute on high for a few seconds. Add cubed onions, capsicum and saute on medium for a few seconds till they are roasted but not softened. Add bhuna masala, chilli powder & kitchen king masala, ¼ cup of water and cook on low for 2-3 minutes till the oil separates from the masala.
- Add cooked veggies, garam masala, kasuri methi, give a good mix & cook on low for 3-4 minutes till the veggies absorb the masala. Take care not to over cook the veggies.
- Add fresh cream, coriander leaves and serve.
Nutrition
If you are trying this out, tag your photos @my_foodstory or use #myfoodstories and share some curry love with me on Instagram


Great base for various types of curry. I’ve added diced tomatoes and other spices for a slow cooked beef or pork curry and another time tried with coconut milk for a creamy chickpea curry. Also freezes very well!
Thank you so so much Carmen! So glad you enjoyed this recipe!
Made this over the weekend and stored it in 7 jars. I just feel like such a load off my back. Already used one jar to make an egg curry. Best part was that all I had to do was boil the eggs, heat the masala for a minute or two on the pan and add the coconut milk and boiled eggs at the end. Nothing else! No washing vegetables, no chopping, no cooking the veggies — it was already done! Phew!
That’s the perfect way to use it! I’m really glad you liked it Meghna
perfect receipe… I have some questions: 1. for how many days I can freeze it and use it? 2. what kind of container you will suggest for freezing and storing?
Thanks in advance.
Hey Nidhi. This can be frozen up to 3 months in advance. I would recommend buying small glass jars and storing them in half cup quantities, so that you only thaw the amount you need for one time use.
Hi, I am planning on trying this recipe soon cos my job doesn’t leave me much time to cook. I see that you mention using dal/lentils with the bhuna gravy, Do you have any recipes or suggestions on how exactly to use lentils with the gravy? I am not sure how the masala would suit a lentil dish like dal fry or dal makhani. Thanks so much.
Hey Nana, I would use 1/4 cup bhuna masala (gravy) for ever cup of cooked lentils. You can cook the masala with a bit of oil to reheat it and add the cooked lentils along with salt and some chopped cilantro.
I really liked the idea of this paste…
I am going to make it as well.
I wanted to know whether making it without salt and spices is better or with as it want to make a base which can refrigerateso can you please help me understanding whether adding salt and spices will affect the shelf life
Hey Kartik – I would recommend adding the spices while making the paste. This will help you do less work when you are actually using it later. The salt will not affect the shelf life as much so you can choose to keep it or skip it.
Hi Richa,
I tried making this and doubling the ingredients to make 2x the batch size. The onion was far too over-powering and we had to play around adding extra tomatoes and spices to neutralise the flavours. Nice recipe though, i just wont use 12 onions next time!!
Thanks for the feedback Rob. The thing is this is more like a concentrate that you can use as a curry paste for other recipes. So when you actually use 1/4 cup of this paste for example in other recipes then it all balances out
Hey Priti, it won’t because this is just a base. I end up adding more ingredients to it to make every curry taste different. For example, adding pureed palak, paneer and some cream makes a very good palak paneer. Adding rajma and more tomatoes make a nice rajma masala. Or adding chicken, potatoes a few more spices makes for a quick chicken curry. You can get as creative as you want. Add cashew paste, kasuri methi, cream, yogurt etc and any other spices you like to this base.
this is a cool idea but wont all curry have the same taste….
Dolphia, it thaws pretty well and since you’ll be cooking it again when you use it, it works. I just leave it out on the counter for an hour or so. You could try the defrost mode in the microwave but I’ve never tried that. The thing is, you don’t use this as is. You’d use this as a base to cook with, which is why it won’t taste watery.
Richa, the photos are gorgeous, but I do have some questions as I am planning to freeze this bhuna masala for myself. 1. Does it thaw well? How do you thaw it? 2. Won’t it taste watery after you thaw them? Keep me posted darling and it’s a brilliant idea for busy bees like us.