The Best Chicken Biryani (Step by step video recipe)
on Sep 26, 2018, Updated Sep 30, 2021
This post may contain affiliate links. Please read our disclosure policy.
This chicken biryani recipe features succulent, juicy pieces of chicken that are cooked in a yogurt marinade and then layered with crispy onions, coriander, mint and basmati rice to give you a dish that the entire family will enjoy. I’ve broken the process step by step and made a recipe video for this chicken biryani so that you can make this restaurant style biryani at home!
Biryani in India doesn’t just mean biryani. There are variations across the length and breadth of the country. There is Hyderabadi biryani (which is what I’m sharing today) where the biryani has a lot of gravy or masala and is cooked slowly with rice in a sealed pot. Then there is the Muslim wedding biryani which actually has lesser masala, but packed with flavour mostly from whole spices; the Kerala biryani, donne biryani from Karnataka and so many more.
In every single form, biryani is delicious and is almost like a one pot meal that’s enjoyed by families and eaten together – like a celebration!
But I have to be a 100% honest with you. I had never made chicken biryani before I decided to share this recipe. And I got convinced because so so many of you have requested for a legit/authentic biryani recipe that was also relatively easy.
And we are biryani lovers. Mostly mutton biryani, but this chicken biryani really changed our mind.
The first time I attempted it, I was nervous, because it seemed so difficult and daunting and it looked like there were a gazillion steps. So I took a deep breath and decided to break them down for you.
Quick Walk Through: Chicken Biryani
Planning on making Biryani? Here are 19 Tips to make the Best Biryani Ever!
Ingredients for Chicken Biryani
Here’s everything that you’ll need to make biryani:
Chicken: I only like to use thighs and drumsticks for chicken biryani because they remain juicy and don’t overcook through the long cooking time. For me, chicken breast is a big no no as it will dry out and will just be rubbery.
Yogurt: Greek yogurt, plain yogurt or homemade curd/dahi works well. Acts as a tenderiser and add some tanginess to the masala
Fried Onions: Also called birista, I’ve outlined the process to make fried onions at home below.
Tip: These days, packages fried onions are easily available and are more convenient option. To store a large amount of fried onions, place them in an airtight container and freeze them for later
Tomato Puree: Used in the marinade for flavour and body
Ginger Garlic Paste: Simply ground ginger and garlic, I recommend making this at home, but if you are in a hurry, store bought works too
Whole Spices: Bay leaf, Cloves, Green Cardamom and Saffron (kesar for that distinct orange colour) – these form the flavour base and give biryani that distinct fragrance that wafts up as soon as you open the pot
Ground Spices: Red Chilli Powder (sub with a mix of paprika and cayenne if living outside India), turmeric powder and garam masala powder.
Tip: For the best flavor and aroma, I would highly recommend making your own garam masala. Don’t worry, it’s pretty simple to make, and I even have a recipe to help you nail it. I usually make whip up a jar once a month and this way it stays fresher and more aromatic every time I use it.
Herbs: Fresh mint and coriander leaves (cilantro) are essential to making biryani. They add freshness and bring the rice and chicken together
Fat & Dairy: Both oil and ghee. You can choose to only use ghee but in my opinion, it makes the biryani even richer. But ghee is what was traditionally used to make biryani. You’ll also need a little milk to soak the saffron strands
Basmati Rice: This is a key ingredient in most biryani recipes, even the ones outside India like the Pakistani biryani and Afghani biryani. Please note that basmati rice is different from long grain rice. A quick note – Basmati has long grains but also comes with a distinct fragrance and flavour. Look for aged basmati rice that has been aged for at least 1-2 years.
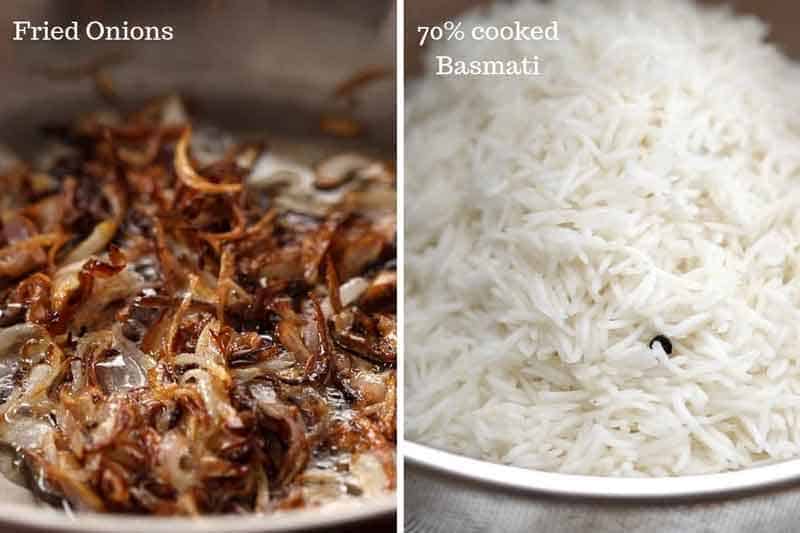
Fried Onions
Fried onions are a key ingredient here, and it’s important to get this right. Onions are cut into slices and then browned on medium flame in oil. They don’t need to be extra crispy, but onions should be a deep golden brown without getting burnt. You can also use store bought fried onions which are easily available in supermarkets these days.
Basmati Rice
While choosing rice for the biryani, make sure to buy ‘basmati rice’ and not long grain rice. While they may look similar at first, good quality basmati rice is fragrant, and has grains that are thin and long as opposed to long grain rice which has fatter grains and almost no fragrance.
The basmati rice is cooked for exactly 5 minutes in boiling water with whole spices and salt to get it to the right doneness – which is 70%. Drain the rice well to get rid of any excess water. The rice will continue to steam when we finally cook it along with the chicken and that’s where it picks all the flavour and perfume from the chicken, saffron, mint leaves and coriander.
Also see: How to cook Basmati 3 ways
How to marinate chicken for Biryani
This Hyderabadi Chicken Biryani gets a lot of its flavor from the marinade. We are using yogurt as a tenderiser, fried onions (birista), tomato puree, red chili powder, turmeric powder, coriander powder, garam masala and salt to flavor the chicken. It’s important to marinate the chicken in a large bowl for at least two hours or overnight for the maximum flavor. Like I said before, I prefer using only chicken thighs and legs for chicken biryani because these are the juiciest and do not become dry while the biryani cooks.
How to make Chicken Biryani
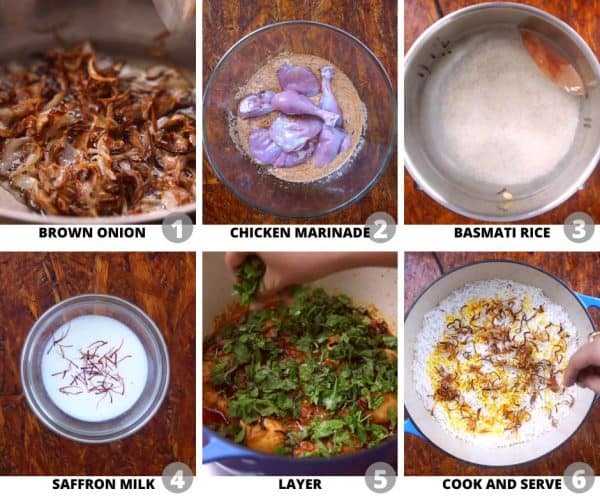
Once you have your chicken marinated, rice and fried onions ready, start by cooking the marinated chicken. To cook the chicken, place it in the dutch oven or a large pot that you plan to use for cooking the biryani, and cook them for 7 minutes. There is no need to stir the chicken, only flip it once around the 4 minute mark.
Once the chicken is partially cooked, the next step is to layer it with the fried onions, mint and coriander. The onions add sweetness and richness while the herbs add a ton of flavor and freshness.
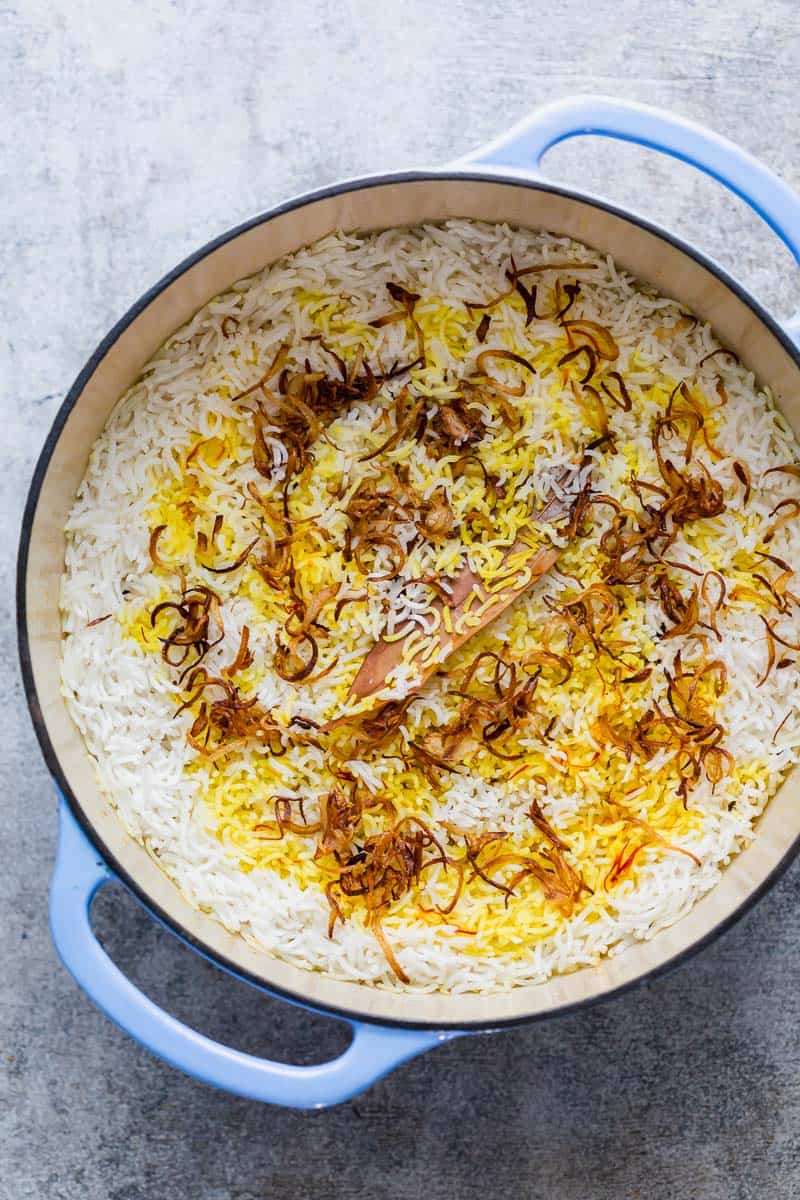
The final step is layering with 70% cooked basmati rice. Sprinkle saffron milk and ghee on top and cover tightly with a lid. Originally, the pot was sealed with dough to prevent steam from escaping, but a tight lid works just as well. It’s important to cook this on a low flame so that the heat distributes evenly and the bottom doesn’t get burnt.
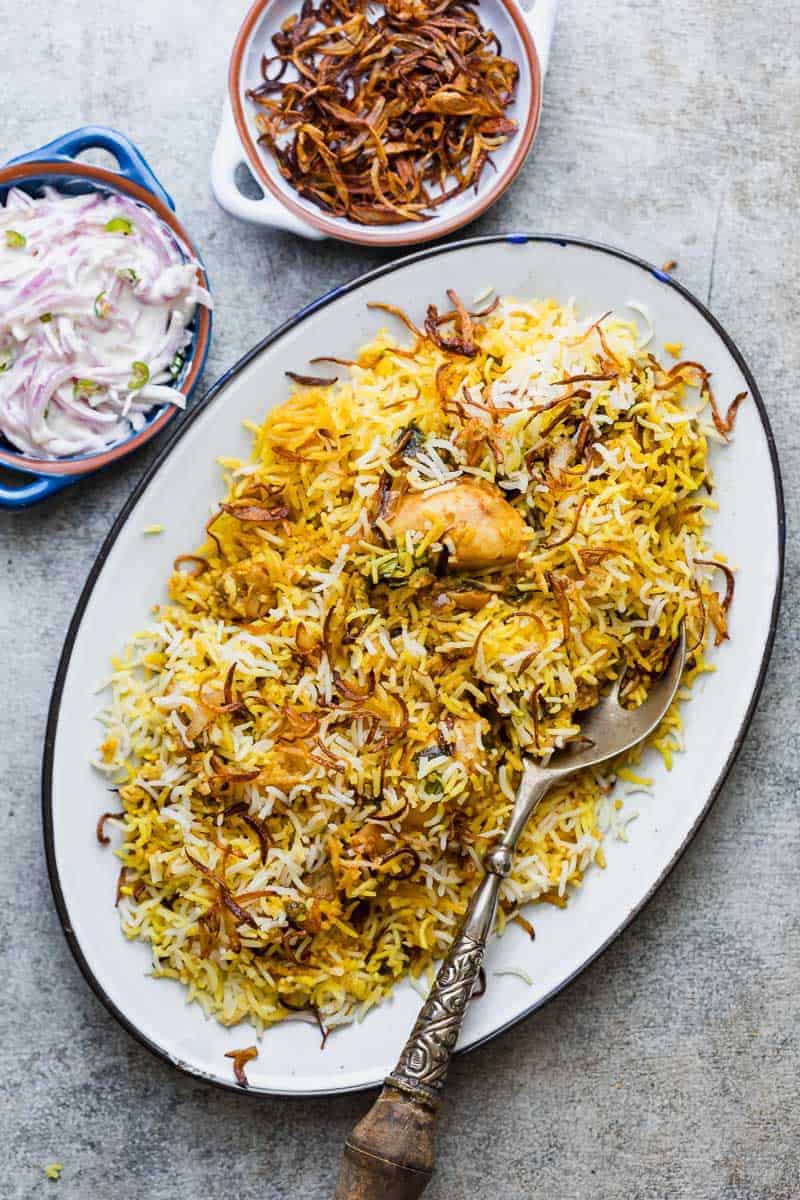
And there you go! The whole thing takes approximately an hour so I call this a weekend project, but after you’ve done it once, you’ll realize how easy and simple making biryani at home is! The results of your labour will look like this, and trust me, there is nothing like the smell of chicken biryani wafting through the house to get everyone to the table!
Let’s just say – five attempts to make sure I provide you with instructions that you can actually follow with ease at home did not seem like work.
FAQs
It’s really important to use a heavy-bottomed pot when you make chicken biryani, or the chicken pieces can be scorched or burnt. A dutch oven will be your best friend while making this biryani because it heats evenly and stays warm. It also has a thick bottom that does not let your food get burnt easily. Another tip is to keep the biryani pot on a tava or flat skillet. This will stop it from coming in contact with direct heat, and it’ll steam at a low heat.
Serve chicken biryani with raita, salan and maybe a salad. Keep simple accompaniments but a good biryani doesn’t need much!
Watch the Recipe Video

The Best Chicken Biryani (Step by step video recipe)
Ingredients
Brown Onions (Note 1)
- 2 Onions, Large
- 1/2 cup Vegetable Oil
Chicken Marinade:
- 700 grams Chicken Thighs and Drumsticks, bone-in and skinless (Note 2)
- 3/4 cup Yogurt, or hung curd
- 1/4 cup Tomato Puree
- 1/4 cup Vegetable Oil
- 1 tablespoon Ginger Garlic Paste, minced ginger and garlic
- 1 tablespoon Red Chilli Powder, sub with 1 teaspoon Paprika + 1 teaspoon Cayenne
- 1 teaspoon Turmeric Powder
- 1 teaspoon Garam Masala Powder
- 2 tablespoon Brown Onions
- 1 1/4 teaspoon Salt
Saffron:
- 2 tablespoon Hot Milk
- 10-15 Saffron strands
Parboiled Rice (70% cooked):
- 2 cups Basmati Rice, Note 3
- 6 cups Water
- 2 tablespoon Salt
- 1 Bayleaf
- 5-6 Cloves
- 2-3 Cardamom Pods
Other Biryani Ingredients:
- 1 cup Mint Leaves, fresh
- 1 cup Coriander Leaves, Cilantro
- 1 1/2 tablespoons Ghee, or Butter
To Serve:
- Crispy Brown Onions
- Onion Raita
Instructions
- To make the brown onions, pat the onions dry and if time permits, leave them out on a kitchen towel for 15-20 minutes to dry them out slightly. Heat oil in a pan and add the onions. On a medium flame, shallow fry the onions for 15 minutes till they are a deep golden brown, without burning them. Drain them out on a paper towel, and set aside. These can be made ahead and stored in an air tight container overnight. Burnt onions will add a bitter flavor to the biryani. You can also use store bought fried onions/ shallots which are easily available in leading supermarkets, Indian and Asian stores.
- Mix together all the ingredients under chicken marinade and marinate for at least two hours or overnight for best results.
- When you are ready to make the biryani, soak saffron strands in hot milk and rub them slightly with the back of a spoon. Set this aside.
- Bring water to a roaring boil and add salt, whole spices and basmati rice. Cook for exactly 5 minutes and drain completely, leaving the whole spices in the rice. This will cook the rice to about 70% doneness which can be checked by pressing a grain of rice between two fingers – the rice should still be raw in the middle.
- Layering and Cooking Chicken Biryani: Heat a heavy bottomed pot like a dutch oven, and add the chicken to it. Cook for 4 minutes and then turn the chicken pieces once. Cover and cook for another 3 minutes. Turn off the heat. Scatter half the onions all over the chicken, and then sprinkle all the coriander and mint leaves. Next layer the rice all over the mint and coriander, and in the end drizzle saffron milk and ghee all over the rice. Cover and cook on a low flame for 20 minutes – this will help steam the rice, cook it to doneness and cook the chicken. (Note 4)
- Once the biryani is cooked, let it rest for 5-10 minutes, and finish by scattering the remaining onions on top. Serve hot digging the spoon deep to get all the layers.
Video
Notes
- While a lot of restaurants use an entire chicken cut into medium sized pieces to make biryani, this is done to cut costs. Pieces like chicken breasts dry out during the long cooking process, and that’s why I recommend using only chicken thighs and drumsticks while cooking biryani at home. You can ask your butcher to cut each chicken leg into two parts to divide it into thighs and drumsticks. Leaving the bone in keeps the chicken juicy.
- Brown Onions can be slightly time consuming and tricky to make, and you can substitute them here with store bought fried onions. Just make sure that the onions are not batter fried. If you are in India, you can buy them online here, and if you live outside India, you can buy them here. They are also available at leading supermarkets, Asian and Indian stores.
- While buying basmati rice, make sure you buy rice that’s labelled basmati and not just long grain rice. Basmati Rice is fragrant and has slightly thinner grains than long grain rice. Real basmati rice is what gives biryani its distinct flavor and taste.
- In the last step of layering and cooking the biryani, all the ingredients are par cooked. Cooking the biryani on a low flame for 20 minutes, steams and cooks everything to doneness. If you don’t have a heavy bottomed pot, and are using a regular pot, you can place it on a tava (or flat griddle) and then place it on the stove on a medium flame to avoid burning the chicken. The tava or griddle creates a degree of separation between the flame and the pot and provides the perfect heat source.

Fantabulous!!! 10 out of five😄😄😄 . My family enjoyed it. And the way u explained was very easy to follow. Thanks for sharing this amazing recipe.
SOOO happy to hear that, Simrandeep! And kudos to you for nailing this chicken biryani recipe!
Hi Richa, thanks so much so sharing this amazing and super easy recipe. I’m definitely going to try this out soon. I could never get my biriyani right. Also I love the way you explain the step by step instructions. Absolutely sweet of you.
Hey Carmel! Congrats on getting your chicken biryani spot on! I’m sure you’ll be making this more often!
Thanks a lot for the recipe. I had a question : can you cook the chicken and keep it aside. And then at a later hour, complete the last step? This is so I can space out the time between us finishing our starters and then getting a fresh biryani off the hob just in time for main course?
Hey Nikunj! That sounds doable, just make sure the chicken doesn’t go hard (if it coolds down too much). Happy cooking!
I followed the recipe step-by-step, and it was a great success. Thanks for sharing this. My family can’t stop raving about the biriyani.
Oh, that’s so wonderful to hear, Ruma! Congrats on nailing this chicken biryani!
Tried my hand several times to make the Biryani, but this recipe has worked like a charm everytime… thanks much for such a simple yet amazing recipe.. 🙂
Soooo happy to know you liked or biryani recipe, Archana! Here’s to many more biryani Sundays!
Excellent I am so happy
Thanks! So glad you liked it Bishal
Good food recipes
Thank you Dilip
Hi Richa, Thanks for this amazing recipe.
It turned out wonderful!!
So flavourful, and easy to follow..especially with your step by step video.
My whole family really enjoyed
Thanks for leaving a comment! Soooo glad you liked it Sacha
Absolutely delicious! This recipe was totally manageable and had all of the right flavors! This recipe is a must try and a great tutorial on a classic Indian dish! Thank you so much for sharing!!
Thanks for leaving a comment! Soooo glad you liked it Emily
Looks delicious. You make it look so easy. Thank you for your post
Thank you