Whole Wheat Pita Bread Recipe
on Mar 04, 2022, Updated Jul 03, 2024
This post may contain affiliate links. Please read our disclosure policy.
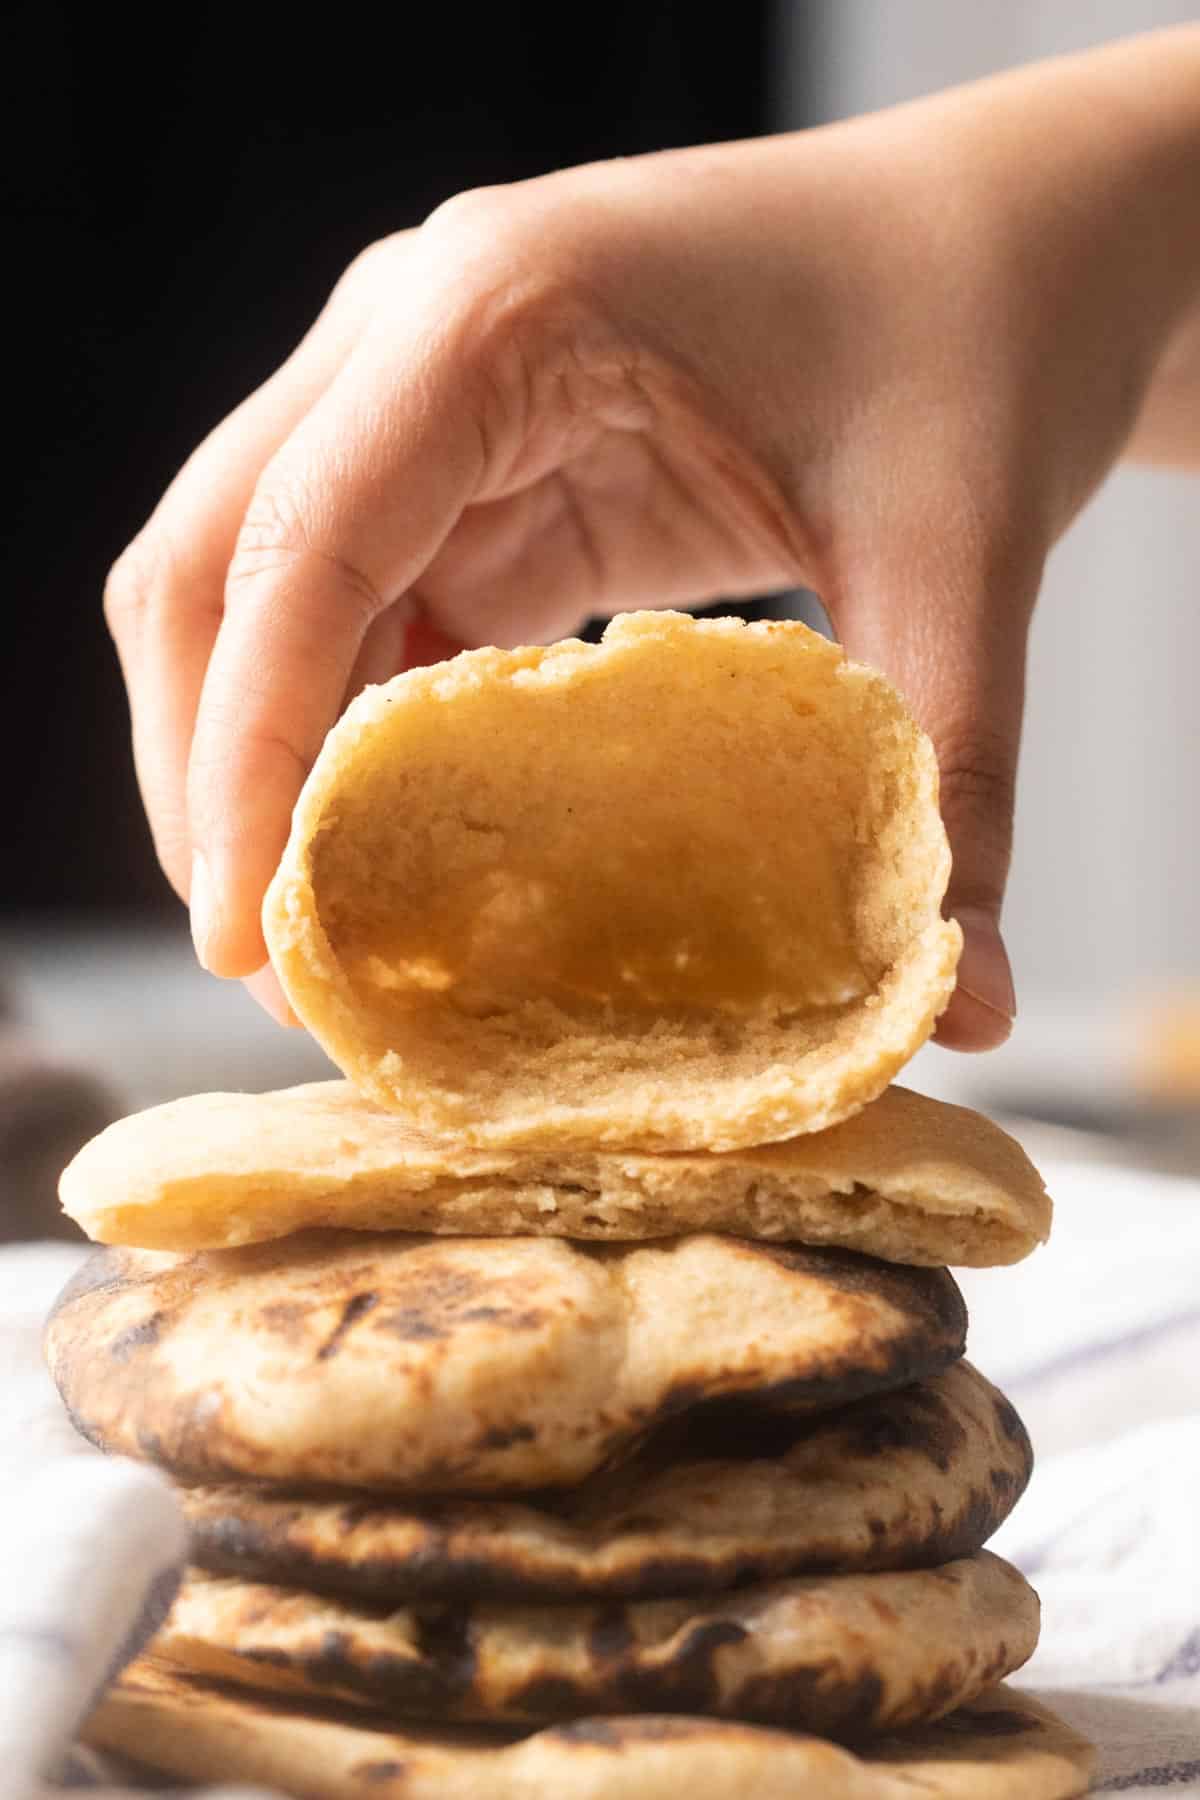
Super fluffy and a whole lot healthier, this whole wheat pita bread is a game changer. This recipe is super easy and perfect for beginners too! Serve with some homemade hummus, falafel and salad for a delicious and heart-warming meal.
Hummus and pita bread is a match made in heaven. But store-bought pita breads are usually made from maida, and I wanted to try to create a healthier version of this delicious Middle Eastern flatbread.
Honestly speaking, I was a little sceptical about using wholewheat flour. But once I tried it, I was pleasantly surprised with the incredibly fluffy, soft and delicious results.
Every time I make these, I plan a delicious Middle Eastern spread for the family with shawarma, labneh, hummus, falafel and my chickpea salad.
Make this recipe
- Made with 100% whole wheat flour, whole wheat pita is a lot healthier than its maida counterparts.
- Whole Wheat flour adds a nutty, rustic flavour to the bread.
- Can be made in an oven as well as on the stovetop.
- Delivers perfectly fluffy results with beautiful pita pockets each and every time.
- Can be frozen for up to 2 months.
- The dough can be made ahead and refrigerated for up to three days. This way you can have freshly baked pita bread whenever you want!
Ingredients for Pita Bread
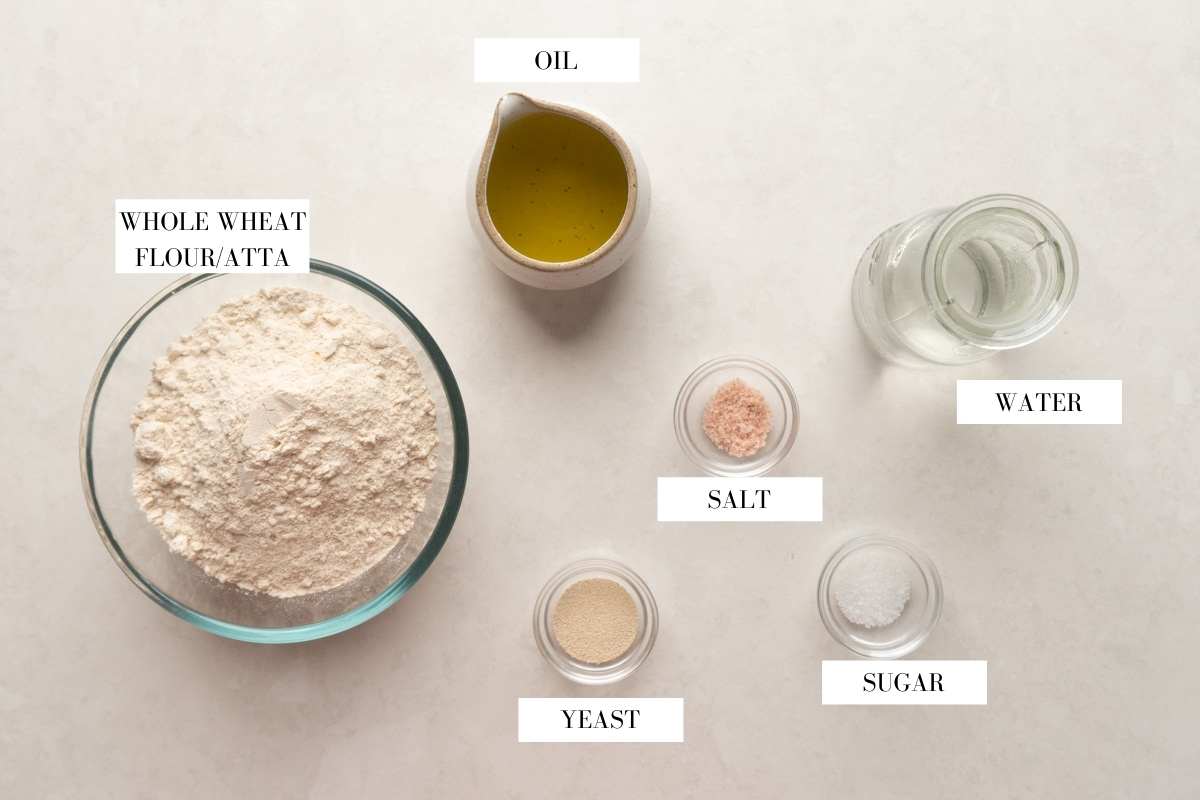
- Flour: This pita bread recipe uses 100% whole wheat flour.
- Oil: Olive Oil adds flavour, keeps the dough soft and prevent it from drying out
- Yeast: A very important ingredient that helps the dough rise and double in size. I have used active dry yeast, but you can use instant yeast as well.
- Sugar: Helps activate the yeast.
- Water: This recipe uses lukewarm water to activate the yeast and then knead the dough.
- Salt: Adds flavour
How to make Whole Wheat Pita Bread
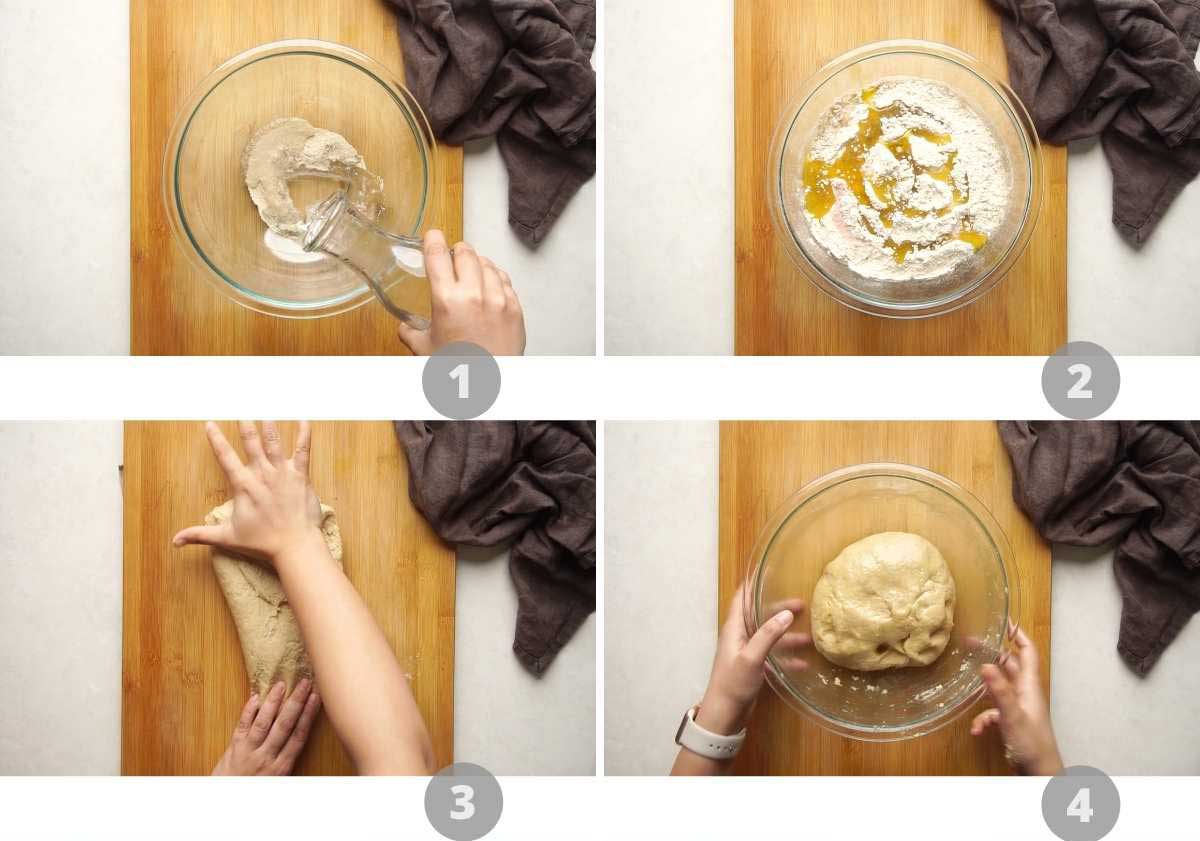
- Add warm water, sugar and yeast to a bowl and mix until yeast is dissolved. Allow this to sit for 10 minutes. The yeast feeds on the sugar and the warm temperature of the water allows it to activate. This causes the yeast to release carbon dioxide making the liquid frothy. If you can see bubbles on the surface, it indicates that the yeast is active and good to use! If your mixture doesn’t activate, that means the yeast is dead and cannot aerate the dough. In that case, do not continue with the next steps as it will result in a flat dense dough.
- Once the yeast has proofed, add whole wheat flour, olive oil and salt. Mix it in until well combined using your hands.
- Knead this mix for 8-10 minutes until it forms a soft and pliable dough. Alternatively, you can also use a stand mixer with a dough hook attachment on low speed and run it for 5-7 minutes or until the gluten has formed.
- Shape the dough into a round ball and transfer it to a mixing bowl. Using a few drops of oil, coat the dough on all sides and grease the inside of the bowl as well.
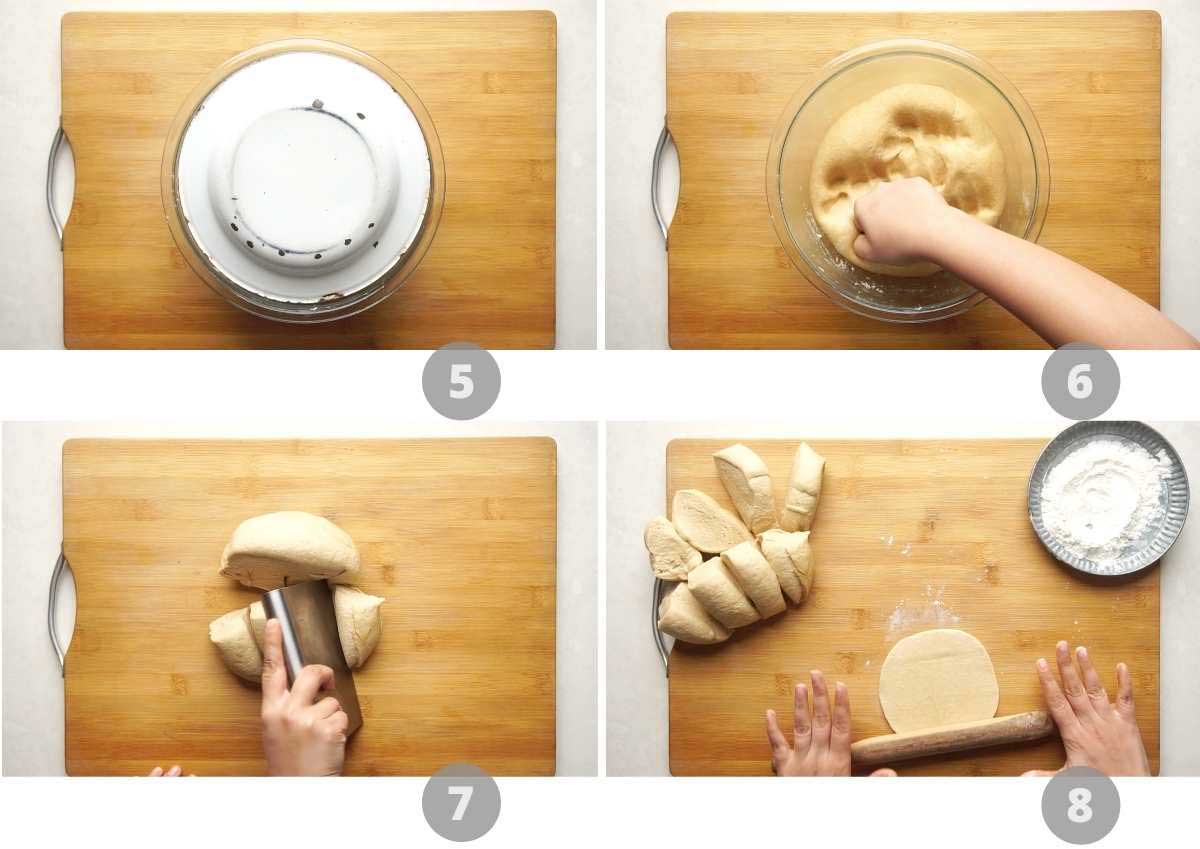
5. Cover and let rise for 1-2 hours or until doubled in size. The time it takes for the dough to rise may vary depending on the atmospheric conditions.
6. Once doubled, punch down the dough and transfer it onto the counter. Knead it for 1-2 minutes and shape it back into a round dough ball.
7. Divide the dough into 10-12 portions, depending on the size you like, and form each portion into a small round ball. Set aside and keep covered under a slightly wet cloth.
8. Sprinkle some whole wheat flour on the counter. Take one portion and roll it out using a rolling pin into a flat round of about ¼ inch thickness. Repeat this with all the dough and set aside. Remember to always keep the dough covered using a damp cloth, this helps retain the moisture.
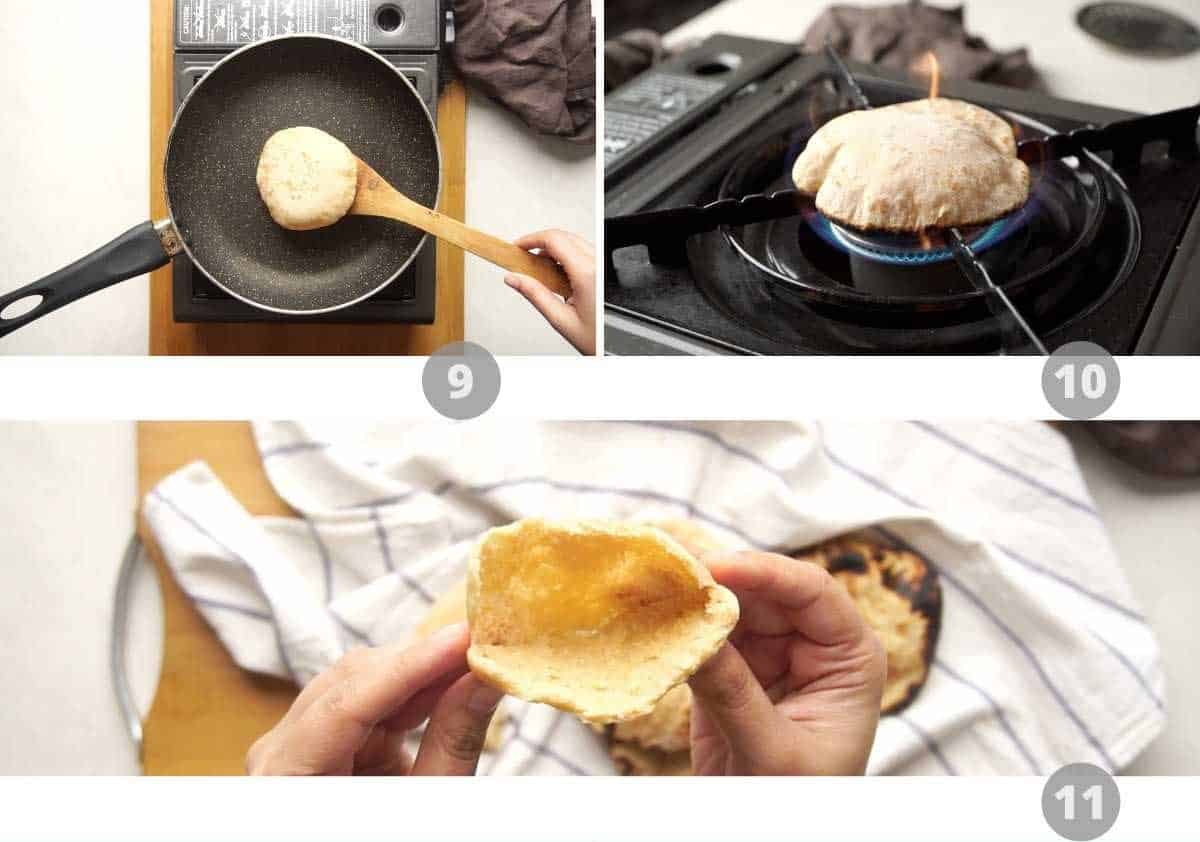
9. Start on a hot tawa or skillet when you cook them. If your skillet is not hot enough, the pita will take too long to cook and this will dry them out.
10. You can start the pita on a tawa, and finish them on an open flame to puff them up. If you don’t have an open flame, you can press down gently with a cloth or spatula along the sides and they will start to puff up on the skillet. Transfer to a serving plate and serve hot with hummus and falafel!
Richa’s top tips
- Allow the yeast to proof in warm water for at least 10-15 minutes before adding it to the flour. This is an essential step to activate the yeast and allow the dough to rise properly. You can skip this if you’re using instant yeast.
- Make sure the water is lukewarm (about 45° C). Hot water will kill the yeast and if the water is cold, it won’t be activated.
- Remember to knead the dough for at least 10-15 minutes until soft and smooth. You can also use a stand mixer for this which will reduce the kneading time to 8-10 minutes.
- Roll out the dough evenly and carefully to ¼ inch thickness to make sure that the pita bread puffs up perfectly and has those beautiful pockets.
- If you are freezing these pita breads, place them in airtight boxes or ziplock bags with parchment paper between each pita to prevent them drying out or sticking to each other.
- To refrigerate the dough for later, make sure to proof it and let it double in size. Then punch it down and refrigerate
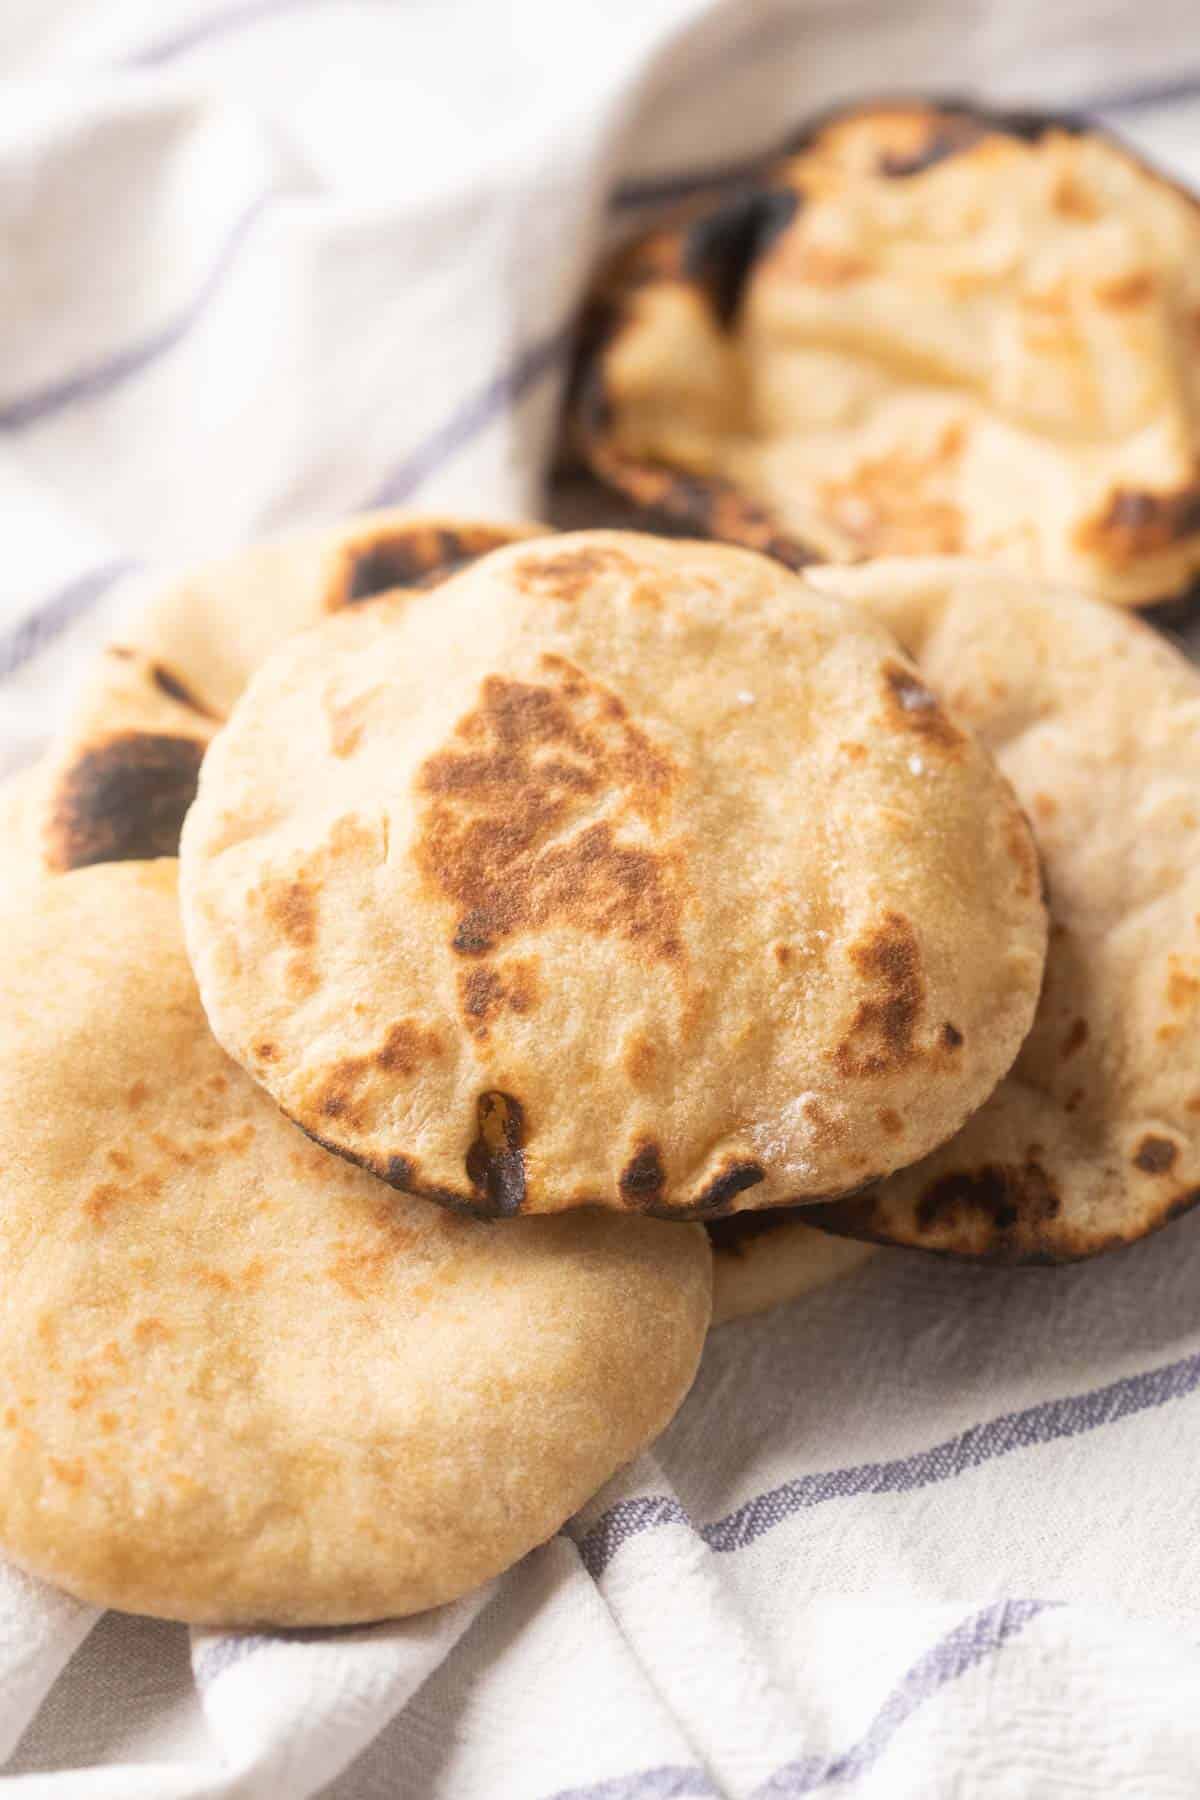
Baking your own breads at home is a whole different vibe and this way, you know exactly what’s going inside. Plus, the joy of eating freshly baked, warm bread is truly unmatched. Serve this with some light and airy hummus for a quick 6-pm snack. Or fill those whole wheat pita pockets with some falafels and pickled veggies to make a wholesome meal.
Serve these with Pita


Watch the Recipe Video
LOVE THIS RECIPE? Subscribe to my newsletter and be the first to receive all new recipes!

Whole Wheat Pita Bread
Ingredients
- 2 Cups Whole Wheat Flour, atta
- 6 Tablespoons Olive Oil
- ½ Teaspoon Sugar
- ½ Tablespoon Active Dry Yeast
- ¾ – 1 Cup Warm Water, at approximately 45C
- ¾ Teaspoon Salt
Instructions
- Add warm water, sugar and yeast in a large bowl. Stir gently. Set aside for 5-10 minutes or until the yeast gets activated. Once the yeast is active, the surface will be slightly frothy.
- Add whole wheat flour, olive oil and salt to the yeast mixture. Mix together till everything comes together in a lumpy ball. Knead for 8-10 minutes by hand or use a stand mixer and knead on low for 6-7 minutes. The dough will be slightly sticky and that's normal.
- Place the dough in a large bowl lightly coated with olive oil. Make sure the entire dough is coated with oil. Cover the bowl with a warm wet cloth (dip the cloth in warm water and squeeze out the excess water). Allow the dough to rest for 1-2 hours or until it doubles in size.
- Once doubled, punch the dough to release air. Divide the dough into 12 equal portions and shape them into balls. Cover back with the same cloth and allow to sit for 15 minutes.
- Roll out the dough balls into ¼ inch thick rounds. Dust with a little flour, if necessary. Keep covered while you heat up the skillet
Stovetop Cooking Instructions
- Heat a cast iron skillet or a frying pan on a high flame. Place a pita bread round on the pan or skillet. Cook for 1-2 minutes on each side, lightly pressing it down with a spatula.
- After lightly cooking both sides, place the pita directly on the fire and allow it to puff up.
- Cook until lightly browned and transfer onto a plate and serve hot along with hummus and falafel!
Oven Cooking Instructions
- Place a baking sheet in the oven and preheat oven to 220 C/428 F
- Once the oven is preheated, carefully take out the baking tray using oven mitts and gently place the rolled out pitas on the baking sheet. Using oven mitts, place the sheet back into the oven. Bake for 7-10 minutes till the pitas are all puffed up and a light golden brown on top.
- Serve hot.
Video
Notes
- Allow the yeast to proof in warm water for at least 10-15 minutes before adding it to the flour. This is an essential step to activate the yeast and allow the dough to rise properly. You can skip this if you’re using instant yeast.
- Make sure the water is lukewarm (about 45° C). Hot water will kill the yeast and if the water is cold, it won’t be activated.
- Remember to knead the dough for at least 10-15 minutes until soft and smooth. You can also use a stand mixer for this which will reduce the kneading time to 8-10 minutes.
- Roll out the dough evenly and carefully to ¼ inch thickness to make sure that the pita bread puffs up perfectly and has those beautiful pockets.
- If you are freezing these pita breads, place them in airtight boxes or ziplock bags with parchment paper between each pita to prevent them drying out or sticking to each other.
- To refrigerate the dough for later, make sure to proof it and let it double in size. Then punch it down and refrigerate
- If baking the pita bread, putting rolled out dough on a hot baking plate helps it puff up better and faster


I tried this recipe and it turned out really well, thank you!!
Hey Vicki, that sounds too good. thanks.
Followed this recipe to the T and it was a fail x
Hey Rhonda, I’m sorry this didn’t work out well for you, i have cooked this a multiple times and it has turned out perfect.
Thank you for this recipe! it was so easy to make and turned out amazing! I will never buy store pita bread again. Fresh out of the oven with some hummus, delish! I baked mine on a pizza stone in batches and they cooked beautifully.
Yaaay! that’s amazing Sheri. thank you for your comments.
Good luck to anyone trying this whole wheat flour pita bread. Recipe is close to 90% hydration. You are going to need it. Just be sensible, drop the hydration to 65-70% and move on. Just a sticky mess.
Hey Zoki, thank you for your feedback.
I followed exactly. Every step was as written. I tried two on a very hot comal on top of the stove and the rest on a very hot preheated sheet in the oven. I got no pockets in any of them
Hey Karen, So sorry it dint work out for you. have you proofed the dough well? I have tried this recipe multiple times and the pita pockets were formed very well.
The dish is amazing and the recipe is made in heaven. I really enjoyed it and will try it myself.